
DISCLAIMER – I AM NOT A PROFESSIONAL. I AM VERY MUCH JUST A STUBBORN “I CAN DO THIS / FIGURING IT OUT AS I GO” TYPE OF PERSON. PLEASE USE YOUR DISCRETION WHEN FOLLOWING MY TIPS AND IT IS BEST TO RUN IT PAST AN ACTUAL PROFESSIONAL IF YOU HAVE QUESTIONS OR WANT PROFESSIONAL ADVICE.
Once all our decision had been made, it was time to get started on the deck. To do so, I needed to draw the plans of how I wanted to build it so that I could determine a supplies list.
Out came the trusty pencil, paper and ruler to get the plans drawn up. I drew both the footings location in relation to the frame, as well as the frame outline. This would be our guide for the full build, so as you can see from the below picture…there are some eraser marks from numerous edits to the plans.
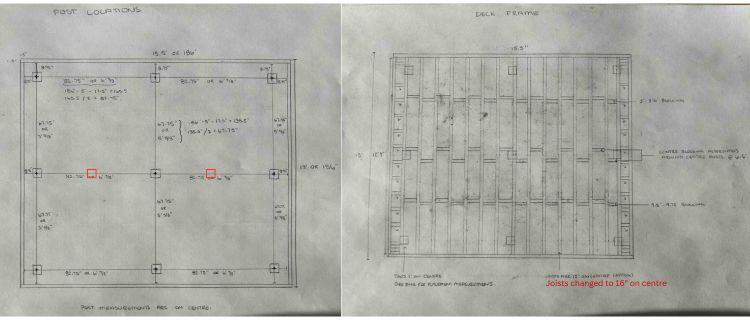
Footings Map
Based on what I had read and watched, it was suggested to have no more than 8′ between supports, so I went with just under 7′ between footings for the length of the deck and just under 6′ between footings for the width of the deck.
Temporarily fast-forward to when we are actually building the deck. My dad and I were looking at the supports that I had in and he recommended an extra footing in the middle row of the deck, on either side of the center footing. Although this would have been fine, he noted that the extra footing would ensure no sagging or bouncing of the deck surface when walking. We did end up adding a those extra footings on some cement pads, and I am happy we did (see red squares added to the above drawing).
LESSON WE LEARNED – FOOTING DISTANCE – 8′ is the maximum recommended gap between footings. It is recommended to plan between 4′ – 6′ between footings for a more sturdy final product. I am very happy that we did this as I am sure we would have had a minor bit of play with our deck surface. Instead, we have a very solid and sturdy deck surface.
As mentioned, we decided to float our frame and overlap the edges past the footings. Again, I wanted to make sure that the edges were sturdy and no bounce or play to the deck surface, so I made sure that we only overlapped by 10.25″ from the center of the posts to the outside edge of the frame.
In articles and videos about doing the frame in this way over the footings, it was recommended to overhang by no more than 12″. Ours has no movement at all when stepping on the edges of the deck.
Deck Frame Plan
As mentioned previously, I wanted to have the aesthetic of single boards going the full length with no seams, so I built my frame under 16 feet, which was the maximum length of composite surface board I could get.
Outside frame pieces are longer for the length of the deck, with the width ends attaching inside those boards. We did this so that the support beams ran the same length as the outer frame end pieces. You will not picture frame these cuts, they should be butted end to face so that a corner joist can be used to secure the end frame pieces. This allowed all of our hangars to go along the same boards. We added screws from the outside edge, through into each board as well.
NOTE – OUTER FRAME: We are not sure if this is the correct orientation to attach the outer boards of the frame, but it worked well for us.
Left and right ends are narrower than the other supports. This is because there is a support board that attaches to each row of footings. Because I only overhung by 10.25″ or 8.75″ from the center of the post to the inside edge of the frame, that left a narrower support on each end.
There are extra supports along those narrower lengths, as well as double supports in the corners. This was for the picture-frame border that I wanted to add, to ensure there was sufficient places to attach the boards. The extra pieces in the corner is because you will cut the corners at angles to get that framed look, and will need those extra supports to screw into. If going with this option for a boarder, it is very important to add these extra supports.
LESSON WE LEARNED – SURFACE AESTHETIC PLANNING – Make sure you know how you want to finish your deck surface so that you can build in the supports needed to accomplish that final design. If you want to add more flourishes, you will need to add more blocking to those areas for properly securing the surface boards.
You will also note that in the drawing, the support beams that are where the footings are, overlap the footing. This was by design and was a decision I made after watching so many videos and reading so many articles.
In many of the articles or videos that I watched, lag bolts were used to attach the support beam to the side of the footings, which would result in the support beams being shown as lining along the outside edges of those posts in my drawing.
LESSON WE LEARNED – ATTACHING SUPPORT BEAMS – In a few of the articles and videos, it was recommended not to use just the lag bolts, and instead notch the footing post so that the support beam sits directly on the footing, distributing the weight of the deck surface on a larger and more sturdy surface. The lag bolt is then used to secure the post into this notch. This is similar to other woodworking techniques I have used for strength, so it was more appealing to me than relying on lag bolts to hold the weight.
For the additional long support beams, you will use a face mount joist hanger that will attach to the inside of the frame boards, with the support beams sitting in that hanger and being attached with screws.
As mentioned, the drawing shows those additional beams at 12″ on center, but I have added a note that revises that to 16″ on center which is what we changed it to after consulting with some people deck builders at the local building supply store.
Between each support beam, you will note smaller blocking pieces. This is to add supports between your long support beams, so that there is no movement, twisting or bouncing and hold everything firm. You do not need joist hangers for these pieces. We screwed them in directly, with long screws that went through the supports and into the blocking pieces. This is why they are staggered.
LESSON WE LEARNED – BLOCKING – similar to the main support beams, these should be added at a maximum of every 8′, with recommendations suggesting every 4′ – 6′ gives a more solid structure.
Supplies list
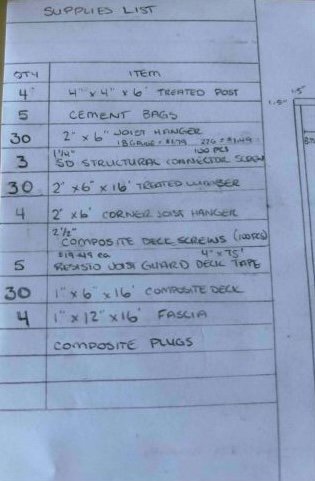
Using my drawings, I was able to determine the items that I would need for the actual build…sort of. This list doesn’t include some of the items that we were picking up elsewhere, and there is always some item that I forget to add, resulting in having to go and grab it as an extra run to the store. The items not listed above are:
- 2″ deck screws
- 4″ deck screws
- Sono-tubes
- Cement
- Cut-N-Seal wood preservative (treats the cut ends of treated lumber)
There are a few additional things that are on this list that aren’t noted or easily discernible from the plans.
LESSON LEARNED – PROTECTING THE WOOD FRAME – In a lot of the videos that we watched, the top of the frame had a thick black tape that covered all the top facing portion of the beams. It went about an inch, or just over, on each side of the beam. This is a “Joist Guard Deck Tape”. It protects your joists from the rain and snow that will get between the cracks of your composite board, leading to a longer board life. This is only becoming a common practice recently. It is like a tar tape.
If you go with the same style composite board as we did, the plugs that you will use in the screw holes will come with the specialty screws, matching the colour of your deck perfectly.
The screws for the composite will also come with a spacer bars, including a guide for the screw locations so that it is in the thicker portions of the composite board, and a special attachment for your drill so that it gets it to the correct depth in the composite for the plugs to be added into.
I did end up with too many joist hangers and 2′ x 6′ x 16′ treated lumber because these numbers were based on the 12″ on center support beams. Once I changed to 18″ on centre, I should have reduced the number. Because they are so long and not something we could pick up with our truck, I also ordered a couple extra in case I made a bad cut, which meant I had even more spares. Oh well, I will find a project for them.
The fascia pieces only come in 12′ lengths unfortunately. It is weird to sell such long boards and shorter fascia, but we made due. This is for covering the visible frame boards along the edges. I went with 12″ because of how high the back of our deck is off the ground.
Next up, the actual build of the deck!

