
Last year I built a raised garden bed for my mom for Mothers Day. She had mentioned wanting another, as well as a privacy planter for her deck. I love homemade gifts, so I offered to make her whichever one she preferred. She decided on the privacy planter, so I found a few options for her to choose from. She ended up choosing this one as the style she would like:

I like the clean and simple look. It is a little different than the other planters I have built as there is gaps between the boards on the planter, so I couldn’t just pocket hole screw the boards together. But I had a plan after a little mulling, and put it into effect.
What you will need for this project:
- Mitre Saw
- Drill (drill bit for pilot holes and bit for screws – Robertson or Philips depending on screws you use)
- Carpentry square
- Kreg jig or other tool for pocket holes
- Rubber mallet
- Spacing shim (I used 1/4″ for the space between the boards)
- Staple gun
- Sander
- Sawhorses (recommended for your back but not necessary)
- Clamps
- Landscaping Fabric (Commercial grade recommended. You can also just make a solid bottom, I prefer the slat bottom with landscaping fabric for drainage)
- Glue
- Screws (1″, 1-1/2″, 2″)
- Stain of your choice (I used a light cedar stain)
The wood and cut list is:
- Planter Box
- 8 – 1″ x 6″ x 84″
- 8 – 1″ x 6″ x 13.5″
- 6 – 2″ x 2″ x 23.5″
- 24 – 1″ x 3″ x 13.5″
- 2 – 1″ x 3″ x 13.5″ – ends to be cut at 45* for framing
- 2 – 1″ x 3″ x 84″ – ends to be cut at 45* for framing
- 4 – 1″ x 2″ x 39.75″ – lengths may vary if you don’t get the center leg properly centered. I suggest cutting them once your planter is together and double check measurements between the legs.
- 4 – 1/4″ plywood – 14″ height x 39.75″ length – same as note above.
- Privacy Screen
- 3 – 2″ x 4″ x 72″
- 12 – 1″ x 3″ x 84″


To get started, I cut most of the wood I would need for this project. As noted above, I did not cut the plywood or the 1″ x 2″ boards that would be the lip for the shelf. Depending on how accurate you place your legs, those sizes could change, leaving gaps between the boards. I recommend holding off on those cuts. Once you have made your cuts, sand the boards as needed in preparation for staining.
I prefer to stain the wood prior to assembly. This helps me ensure that every nook and cranny has been stained and that I won’t end up with any areas that the stain pools a bit because of tough access. This project was especially important to pre-stain the wood as there was going to be a 1/4″ gap between the boards all the way around and I didn’t want to have to fiddle with trying to get a paintbrush in there. It takes a little longer, but in the end, it will give you a nice uniform cover.
I started by assembling “boxes” out of the panels. The planter box itself is 4 boxes stacked on top of each other, similar to the air-conditioner planter & screen that I did previously. This planter has gaps between each section, so I had to assemble it a little differently than the last planters. I wanted to make sure everything lined up properly, so it made the most sense to assemble the stacked boxes first, then attach them together.


Once all of the boxes were built, I started attaching them to each other, using the legs of the planter. Because of the length, I chose to do a middle leg as well as on each corner. I squared the legs to one side of one box first, using both the corners as my initial braces. I then added the second layer to the planter. I started on one side and made sure that it was 1/4″ from the other box, only worrying about the side that I was working on. Some of my boards were warped, so it was impossible to get all 4 corners at 1/4″ at the same time. I had to attach a corner at a time. Once the first corner was done, I moved to the other corner and repeated my steps. I have a chisel that gave me a 1/4″ gap, so I used it as a shim to hold the boxes apart, while I attached the leg.

Once I had the first two boxes attached at two of the corners, I added the center leg. This helped to ensure that the 1/4″ went all the way across the board. You will also notice that I pre-drilled and prepped the screws for each box on the legs. This made it a quick attachment. From there I added the next two boxes to complete the one side of the planter. From there, I flipped it over and repeated the process on the other side.
Once the full planter box fascia was built, I double checked my measurements and cut the plywood that would go on the inside so that the gaps were “filled” from the backside. We don’t want soil or water pouring out! The plywood does not need to be the entire size of the outer box, it just needs to be big enough to cover all the gaps between the boards. I measured mine at 17″, which gave me enough to cover the gaps as well as space to tack it to the inside of the box. I used wood-glue and 1″ screws. If you are not going to use landscaping fabric on the inside, you may want to cover the entire inside of the box with plywood, to ensure a solid wall for your soil. You will also want to put a solid bottom on it….but I will get to that when we get to that part of the build.
While it was on it’s side, I also attached the 1″x 2″ pieces that my shelf was going to sit on. It is not necessary to fill this planter with soil from top to bottom, so I recommend building your bottom half way up. I put mine at 10″ from the top. That is more than enough soil space for plants. Once those were in place, I set the planter on the ground so that I could attach the bottom panels. Once those were in place, I rolled out landscaping fabric and stapled it in. I found it easiest to staple one of the long sides in, and work my way around to the other side. This gave the cleanest attachment. I try not to have too many creases or folds, but they are unavoidable in this style.
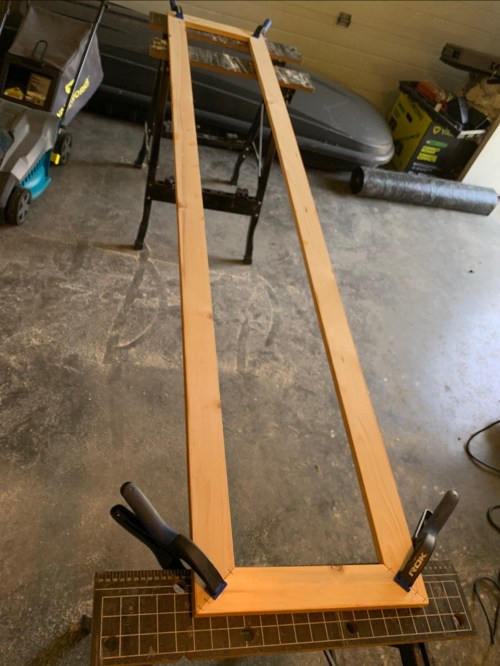
There was one final touch to the planter box, the top frame. I find these easiest to dry-fit on some stands. Once I have them where I want them, I clamp the longer boards to the stands so that they stay in place. I then put glue on the smaller piece and set it into place. Once I have it where I want it, I use the staple gun to provide extra strength to the corners. Once it is glued and stapled, I set a clamp on each corner and let it sit to dry.
Once that was dry, I attached it to the planter box. This is where you need to be a little flexible. I drilled a 1 1/2″ screw into the corner legs, at an angle so that it would go into the top frame. I also used wood glue to give it a nice seal all the way around.


I built the actual screen at my parents house as it was too big to build and fit in the back of the truck. I got side tracked with visiting and swatting mosquitoes, so I forgot to take a picture of that process. I had pre-drilled the pilot holes into the 3 – 2 ” x 4″ boards that I used as the bracing for the screen. This made it really quick to get it all together. I also didn’t notice that I had forgotten two of the screen boards at home, so as you can see below, the screen didn’t go down to the planter. I have since taken over the two boards and just need to add them on.

I really liked how it turned out, and it was not nearly as difficult as I expected it to be when I first started figuring out how I was make it. My mom has also added a few wall pots to the screen, which look awesome. It was a big project, and completely worth every minute for my wonderful mom.


Hi, looks great. Can I ask how stable it is, especially in strong winds. Thanks
LikeLike
Thanks! Due to the width and the tall privacy screen it was secured to the railing to ensure it doesn’t get blown over in strong winds. If going with similar dimensions I would definitely recommend securing it. If it is going to be a stand alone piece, you could look at making the base of it deeper and adding some heavier rocks in the bottom before adding your soils. It would help keep it from tipping by adding the extra weight in the base.
LikeLike
What kind of wood is best for this? I love this!
LikeLike
Thanks! This one is made of pine and stained but you could use cedar and not have to stain it.
LikeLike
I love this! What kind of wood is best?
LikeLike
Thanks! I used pine and stained it. You could use spruce or cedar as well.
LikeLike