
This is a little later than expected, but working from home and then writing blogs in my spare time can be a little daunting. Especially when the sun is shining and I desperately want to get outside and enjoy it.
Below are the plans for each of the planters we built for our front garden. I have done the planters, and will do a separate post with instructions for the trellis in case you didn’t want the trellis portion. Let’s get started with the planters.
Lumber & Supplies Needed
5′ Planter
11 – 1″ x 6″ x 8′ boards
3 – 2″ x 2″ x 8′ boards
2 – 1″ x 3″ x 8′ boards
60 – #8 – 1″ screws
24 – #8 – 2″ screws
18 – #8 – 1-1/4″ screws
9′ x 4.5′ heavy duty landscaping fabric
Wood Glue
Stain – Your choice of colour (We used Ipswich Pine)
4′ Planter
8 – 1″ x 6″ x 8′
3 – 2″ x 2″ x 8′
1.5 – 1″ x 3″ x 8′
40 – #8 – 1″ screws
24 – #8 – 2″ screws
14 – #8 – 1-1/4″ screws
8′ x 43″ heavy duty landscaping fabric
Wood Glue
Stain – Your choice of colour
3′ Planter
6 – 1′ x 6″ x8′
2 – 2′ x 2″ x 8′
1 – 1″ x 3″ x 8′
40 – #8 – 1″ screws
21 – #8 – 2″ screws
10 – #8 – 1-1/4″ screws
7′ x 43″ heavy duty landscaping fabric
Wood Glue
Stain – Your choice of colour
Tools Needed
Drill(s)
Robertson bit
Pilot hole drill bit
Kreg jig
Mitre Saw
Tape Measure
Carpenter Square
Staple gun
Saw horses
Cut List


Drawings


Directions for assembling any size planter
 Step 1: Cut the lumber
Cut all your lumber to the Cut List. Based on an 8′ board, you should be able to cut a long edge and a short edge per board.
For the frame, you will need to cut the ends at a 45* angle as it will frame the top of your planter box. An easy way to do this if you do not have a mitre saw that can do angles, is to cut your boards to the longest length, then use a carpentry quick square to cut the angle needed. To do so, line your quick square up with the top edge and the side edge of your board. Use the 3rd edge of the square to draw a line from one corner down to the bottom edge of the board. This will be the angle you need for framing.
 Step 2: Stain the lumber
At this point I like to stain the lumber on the sides that will be seen. For the long boards, pick the nicest side and stain that side. You will also need to sand and stain the ends of each board as they will be seen once assembled. I also like to stain the top and the bottom as there is a bit of a curve to the edges of the wood, so it will give a nice finished stain once put together.
For the short sides, you only need to stain the outer facing side, and the top/bottom edges of the boards. The ends will be against the long edges so there is no need to stain them.
*You can also opt to stain the planter once it is assembled, I just find this provides a nice even finish with no darker or lighter spots and ensures that the stain is in every nook and cranny.
 Step 3: Kreg Jig the boards
For the 5′ planter, I put 4 pocket holes evenly spaced along one of the long edges (do not do both long edges), and 3 pocket holes evenly spaced on both short edges. For the 4′ & 3′ planters, I put 3 pocket holed evenly spaced along one of the long edges, and 2 pocket holes evenly spaced on both short edges.
You do not need to put any pocket holes in the frame boards, leg boards or the base boards.
Step 4: Assemble each layer of the planter
We created boxes out of the long boards & short boards, which we then attached together. We found this easier than attaching one whole side together, and then the next side, and so on. It also allowed us to make sure everything was nicely lined up and square (step 6).

Step 5: Assemble the top frame
The easiest way to do this is the use wood glue, a staple gun and some sawhorses. We used the sawhorses to save our backs, however if you do not have any, an even and solid ground (preferably pavement of some other sort of hard flooring) works as well. We glued the 4 sides together, making solid corners on each end. We stapled the corners as we went to provide a little extra support for the wood glue to set while we attached each corner.
Once it was assembled, we left it where it was and added the first box on top of it, with the pocket holes facing the frame. We then screwed the first level of the box onto the frame for a nice strong hold.
 Step 6: Assemble the layers of the planter
Continue stacking your pre-built box layers on top of each other and screw them into place. The pocket hole on your long edges should face down towards the level you just finished attaching to the previous edge. Continue until all 4 layers are secured to each other.
As you go along, square up the corners as best you can. If you have some warped boards, this step will allow you to manipulate the wood into a straighter line as you fix it to the board beneath.
 Step 7: Attach the legs
Using the top frame as a starting point for the legs, secure each leg in each corner as tightly to the box as possible. If your covers are not completely square, or if you have a few warped boards that were still a little off even after manipulating them into place, the legs may have some minor gaps between the leg and the outer boards. This is ok.
Use pilot holes to ensure that the legs do not split as you screw them into the box. Use 2″ screws to attach the legs. The legs will stick out the bottom by approx. 2″.

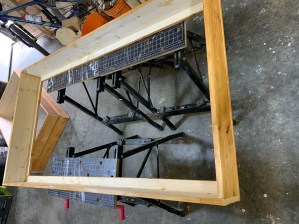
Step 8: Attach the base board rails
Attach the rails that will hold the base board. It is your choice how deep your base boards will go. If you would like the full 22″ of the box to be filled with soil, then you will want to put the rails right along the bottom of the planter. We chose to put ours 11″ down, so we fixed our rails to the point where the 2nd & 3rd board attach.
 Step 9: Attach the base boards
Place all of the base boards prior to drilling them in, to ensure that you have somewhat even spacing between each board. Once all the boards have been placed and are evenly spaced, use a 1-1/4″ screw to secure the rails boards in place. I did not do pilot holes for this portion and found that very few of the boards split.
 Step 10: Place the lining
If you chose to put your base deeper into the planter, then you will need a longer and wider section of landscaping fabric to line your planter with. You will want to make sure that the fabric comes all the way to the underside of your top frame. This will ensure that the dirt is not directly against the wood and will help preserve the planter.
Using a staple gun, we start stapling on one side, making sure it is tight all the way across. We then ensure that side is also tight to the base of the planter. From there, we work around the entire box until all of the edges are secured and the lining is tight. Don’t be to critical if yours is a little loose. The first few planters we did were not the prettiest when it came to the lining, but if you build a few, the linings will get easier to do.
That’s it. 10 easy steps and you have yourself some beautiful planters. I will work on the next build post on how to create the trellis for the back of your planter. There are a number of styles, so I will offer a few options, including the framed lattice that we chose to use on these planters.


One Comment Add yours