
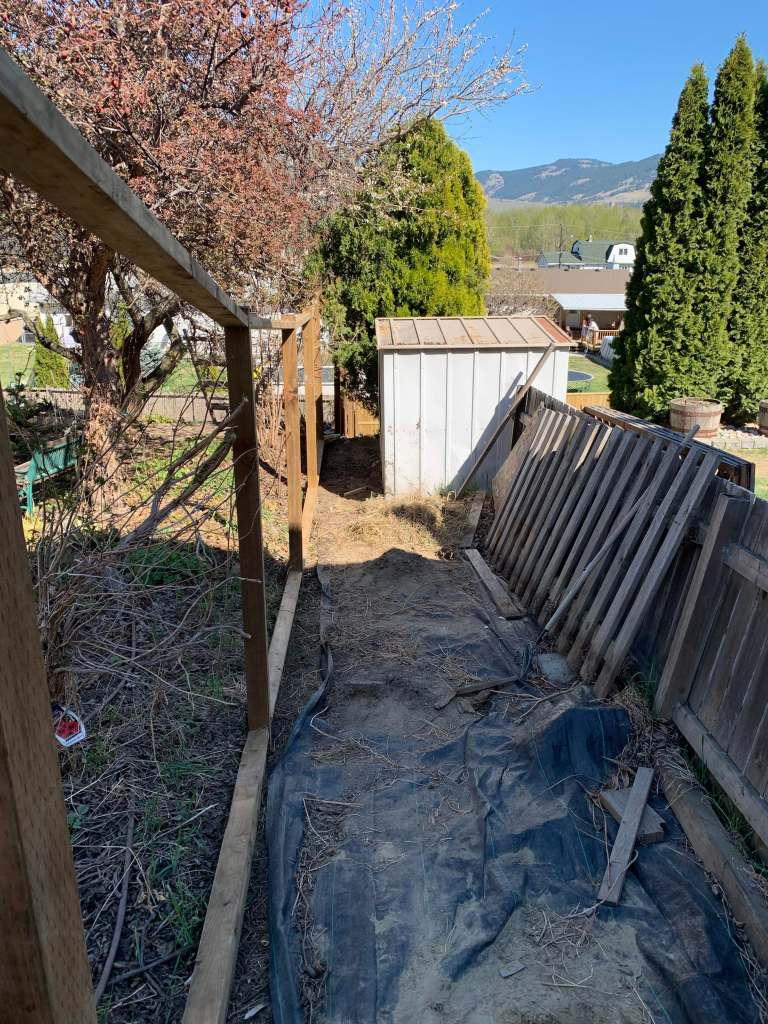
Building a fence on a slope can be a challenge, especially a slope that has different and changing grades throughout the full length. Purchasing pre-built panels is not an option as those are only applicable on flat surfaces or in areas with a very minimal slope. We used an option that gave a very professional, finished look and was easy to build with little experience required. Here is how to build the same panels.
The below information is based on 8′ panels that will be approx. 6′ in height.
Supplies Required
- Mitre saw, circular saw or hand saw (whatever you have to cut boards down, however I do recommend something powered over the hand-saw otherwise it is going to take a while)
- Table Saw, circular saw or hand saw (same note as above)
- Drill
- Air compressor
- Brad nailer
- Measuring tape
- Post level or 2 smaller levels (the post level is cheap to buy, so I highly recommend in investing)
- Roll of string
- Brightly coloured spray paint
- Sharpie or carpenter pencil
- 2″ deck screws
- 1-1/4″ brad nails
- Cement (may need sonotubes if your ground is sandy)
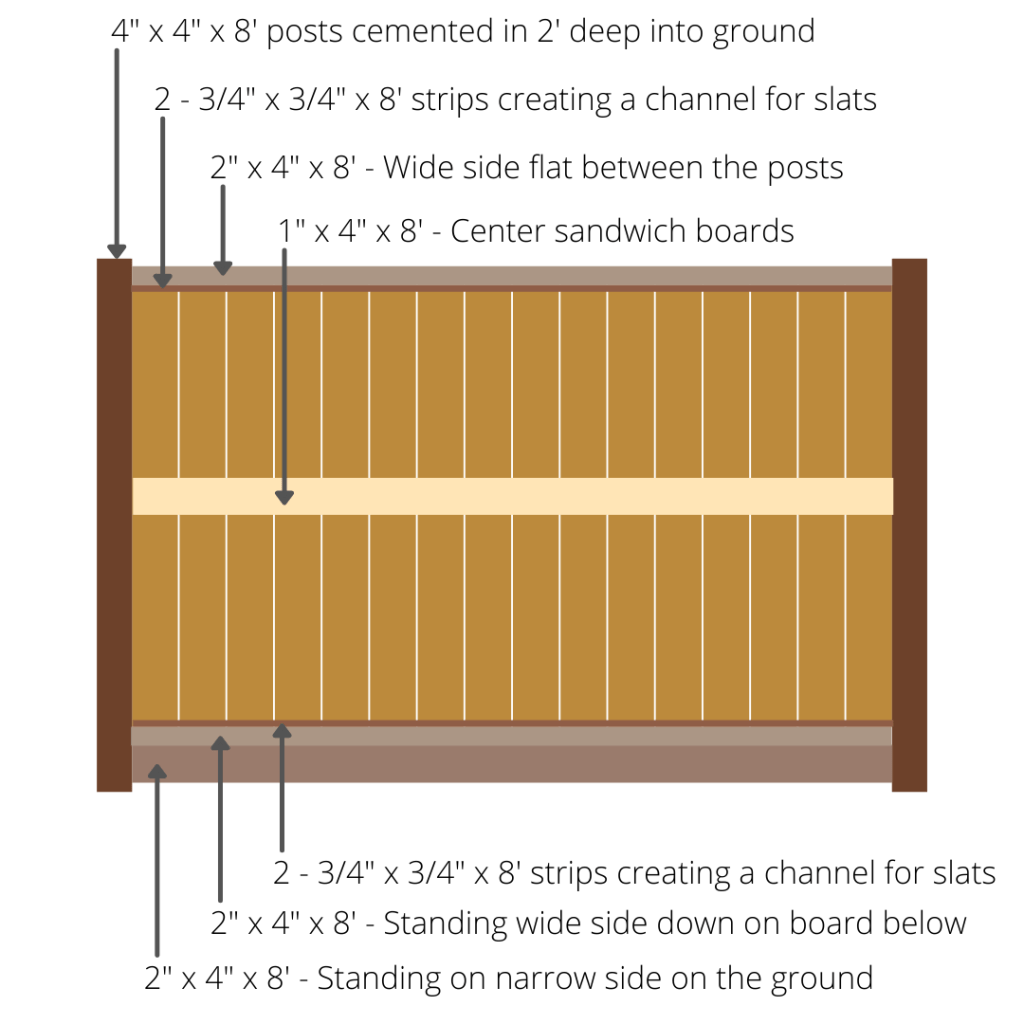
Lumber Required (per panel)
Your choice on treated vs cedar. We did ours with treated lumber. Note that the first panel will require 2 posts, and then each subsequent one will only require 1 as it will join with the previous panels post. For example, if I am building 5 panels, I will need 6 posts.
- 1 – 4″ x 4″ x 8′ fence posts
- 3 – 2″ x 4″ x 8′
- 4 – 3/4″ x 3/4″ x 8′ strips (we purchased a 2″ x 2″ x 8′ and cut it into 4 strips as we couldn’t find the 8′ strips at a reasonable price. This was a more cost effective option, but you will require a table saw)
- 16-17 – 1″ x 6″ x 6′
- 2 – 1″ x 4″ x 8′
Basic layout of the fence panel
Step by Step Instructions
Step 1: Measuring Post Hole Points
You will want to make sure that your post holes are not going further apart than 8′ to ensure that your wood will properly fit between the posts. If you end up with a longer distance between, then you will be running to the hardware store to get 10′ lengths of 2×4.
To start, attach a string to the beginning and end of your fence line. If you have a flat yard, this is easy, just stake either end or attach the string to the fence posts that make up your side fence, and have it sitting about 1′ above the ground. Make sure your attachment point is the same on both sides. You can have the string run right in the middle of where your posts are going to sit, or you can choose the front side or back side. We chose to do the edge of the posts as you can use the string to help make sure your posts are not twisted in the hole and that they are all straight to each other.
If you have a sloped yard, this is a bit more challenging. You will need to add some extra stakes along the length of the fence-line, following the slope, so that the string stays 1′ above the ground. It is a bit of extra work, but worth it when it comes to digging your post holes.
Once you have your string in place, grab your measuring tape and a can of spray-paint. Starting at one end, start measuring 8′ lengths. I know, it seems like you should measure slightly less than 8′, however if you dig your holes exactly where you spray paint, your panels end up being approx. 7-3/4′ to 7-1/2′. Depending on the length of your yard, you may end up with a shorter panel, so consider this when choosing where to start your marks. With our side fence, we knew there would be a short panel, so we started our measurements in the bottom corner, adjacent to our back fence. This resulted in the short panel being beside the house where our gate will attach. It is less noticeable in that spot, so it made more sense to add that. Last year, we did the opposite and ended up with a little gap at the bottom corner, which wasn’t ideal, but a gazebo will be going there, so it won’t be seen.


Step 2: Placing the posts
Due to the height of this finished fence being 6′, I recommend digging 2′ holes for the posts. There are a number of ways you can do this, but I recommend a post hole shovel or a post hole digger to get a good, deep hole without being too wide. A standard shovel will get you a deep hole, but it will also be much wider than you need. Make sure to dig out your spray-painted mark to ensure you are not straying from you 8′ distance.
To measure the depth, we marked a scrap piece of lumber and used it to take measurement of each hole. You can also just use a tape measure, but the board with a mark on it was quick and easy to check the hole depth.
If you are building the fence along a flat yard, I recommend running another string at the top of your posts, at the height that you want your fence. This will ensure that all your posts and panels will be the same height and you won’t have to cut any of the post tops off to make it line up. Along a sloped yard, this is not important as the posts will all be sloping and not lining up along the top anyway.
As we dug the holes, we put a post in so that no one would accidentally walk into one of the holes or injure themselves. It is easy to break an ankle if you aren’t paying attention. It also gives you a rough idea of how the fence will line-up before you start cementing. On the odd occasion, you may need to move your hole slightly one way or the other to line up properly. The string does a great job of showing the line, but the hole will sometimes still stray and need some adjustment.
Step 3: Cementing the posts
With a sloped fence, we highly recommend cementing the posts in. There will be pressure from multiple angles, so it is worth making the base very solid. Along a flat fence, with the right soil, you can just pack the dirt down and not use cement, however make sure to pay attention to the type of soil you have. Our yard has about 5 different types of soil ranging from very hard packed clay to extremely loose sand and bedrock. In areas of our yard, building our rock walls has required sonotubes for concreting the posts in.
If you have the right soil, you can start cementing your posts in. You will want to pay attention to ensure that the post is facing the previous post so that the 2″ x 4″ x 8′ will be flush to the boards and not angled. You will also want to make sure that your posts are perfectly vertical and upright. This is where a post level comes in handy as it will allow you to level the post both front and back at the same time. Before we invested in one of these cheap little levels, we had to use 2 separate levels to make sure it was level from side to side and front to back. It was challenging and time consuming. The post level will make things much faster.
Although you can manage this step on your own, it really is easier and faster with 2 people. 1 person to ensure they are holding the post level and the other to pour the cement. You can also use scrap lumber and stakes to hold the posts in place while you cement. Depending on your cement mixture, you may need to do this to brace the posts while the cement cures. We keep our mixture like a thick porridge and found we did not need to let the cement cure. The posts did not move at all.
Step 4: Framing the Panels
Once the cement has had a chance to cure and the posts are solid in their holes, it is time to start framing the panels. You will need 3 – 2″ x 4″ x 8′ for each frames panel. There will be 2 at the bottom and 1 at the top.
For the bottom part of the frame, you are going to create a “T” with the 2″ x 4″ x 8′. Measure the distance between the base of the posts and cut 2 of the 2″ x 4″ x 8′ to the correct length. Note, that if you are on a steep slope, you may need to cut your 2″ x 4″ x 8′ with an angled end instead of flat. I am sure there is a proper way to do this, but we did it by holding the boards against the post and using a sharpie or carpenters pencil (thick lead) to draw the line on, capturing the angle that it needed to be at. It worked like a charm and we didn’t end up with any boards that did not fit. On the odd one, we had to shave a little of an end to get the fit snug but not pushing on the posts.
As you place the first board, on the short side, creating the bottom part of the “T”, you may have to dig out a channel to ensure it is not high centred and sits at a specific point on each post. Using 4 screws per end, toenail the screws through the end of the 2″ x 4″ x 8′ to secure it to the post.
Once you have that board in place, lay the next board on top of it, wide side down, creating the top of the “T”. Using 2 screws per side, toe-nail the board to the post. Use 5 screws down the length of the board and drill straight down into the lower board, making sure to stick to the middle so that you are not missing the bottom boards narrow edge.
Once both are in place, double check the size on the top board. It should be the same size, however it is always good to double-check. Cut it to size. Using 2 screws per end, toe-nail the board to the top of the posts. You can attach exactly at the top, or leave a 1″ gap for a bit of a top to the posts. We chose to leave a 1″ gap at the top.
To ensure an even panel, measure from the bottom plate to the top of the post to ensure your top board will be equal distance from the bottom on both ends. We didn’t do this and ended up with one panel that is noticeably shorter on one end. Not a problem as we were aiming to get as much height as possible out of the panels, but if you want a super uniform look, it is important to measure.


Step 5: Adding the Panels
If you manage to find 3/4″ x 3/4″ x 8′ strips at a reasonable price, jump to the next paragraph. If you didn’t, and you have to rip your 2″ x 2″ x 8′ boards into 4, continue reading. Set your table saw to the height required. As a 2″ x 2″ x 8′ board is really actually about 1.5″ x 1.5″ you will want to set your fence at 11/16″ for equal sides. Double check your board thickness as it can vary from 1.5″ – 1.75″. Find the middle and account for the kerf of the blade. Rip it down the middle, then rip the 2 pieces again down the middle to get the 4 strips you require for each panel.
Now that you have your strips, it is time to place them. On the bottom, you are going to attach 2 pieces with a channel that is thick enough for your 1″ x 6″ slats to fit in. The trick we used to make this a quick process is that we held 3 strips together and centered it on the bottom frame. We then nailed one side in, gave a little wiggle room to the middle strip and then nailed the far side strip in. Once nailed, remove the middle strip (as you haven’t nailed it in place but just used it as a spacer).
Next nail only 1 top strip into place. Using both strips, line it up with the edge of the 2″ x 4″ x 8′ top board. Nail in the one closest to the middle. Place the second strip in a safe place while you build the panel.
This part can be a little tedious. Once again, the super accurate way of measuring (slight sarcasm, but it works, so why not?), hold the board up to the frame, ensuring that there is a bit of overlap on top and bottom. Using a sharpie or carpenters pencil, mark the angle that the wood needs to be cut at. NOTE: Make sure you are using the frame to make the marks and not the 3/4″ x 3/4″ strips, otherwise your boards will end up too short.
As you cut each board, place it in the channel before measuring the next board. Place the boards by putting the bottom of the board into the channel, and then pushing the top of the board agains the back panel. Add 2 – 3 brad nails along the top and 1 at the bottom to hold the slat in place. Continue along until you reach the end of your panel.
You will likely end up with a skinny piece that needs to go in the end. Take measurements of the size it needs to be, then use the table saw to rip the board to the correct side. Place and brad-nail to secure it. Once your panel is complete, add the other side of the top panel and brad nail it into place, creating the top channel around the top of the slats.

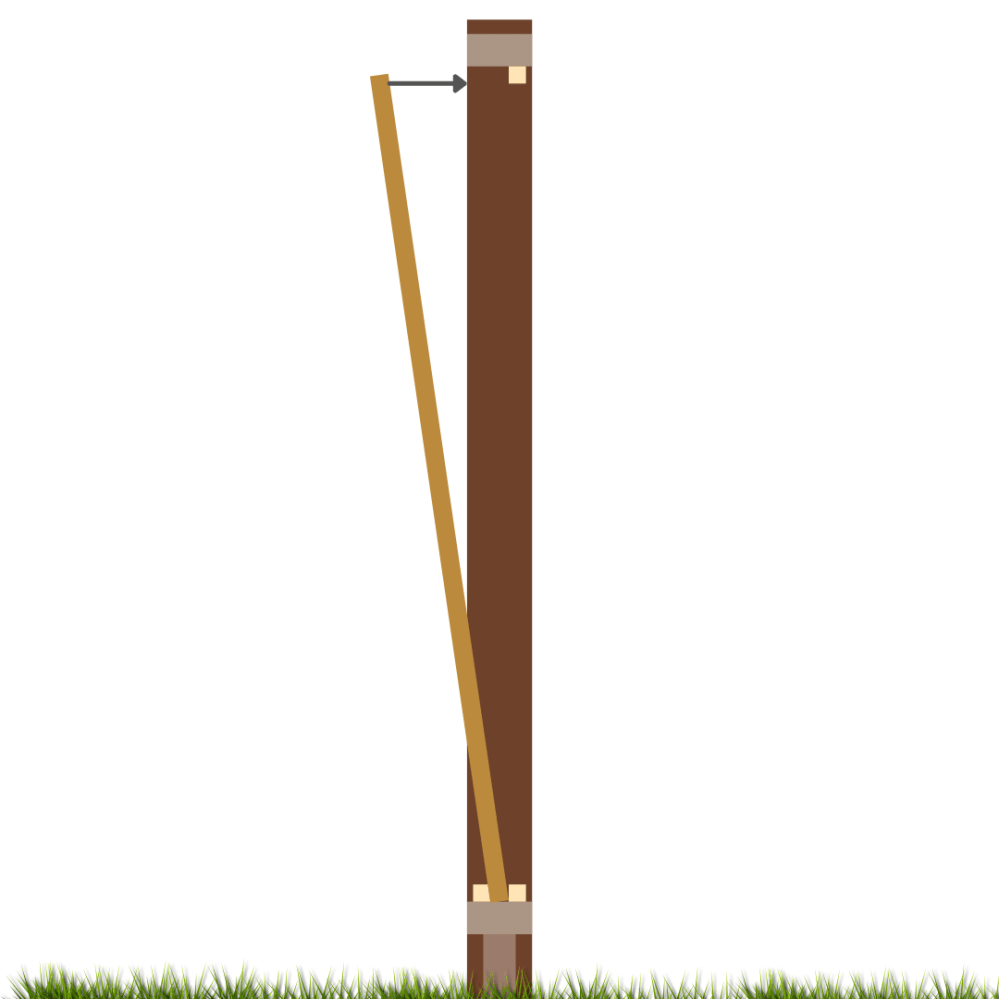


Step 6: Stopping the Twist
If you use treated wood like we did, then as it dries out, there may be some twisting of the wood. To help combat this issues, we used a center board to help sandwich the slats together and provide some extra bracing.
Measure approx. 34″ down your post from the top frame. Make a mark on both posts for reference. Cut the 1″ x 4″ x 8′ board to the size that fits between your posts. Note that the ends might also need to be cut at an angle for a tight and finished look. Once cut, place your boards so that the centre of the board lines up with the 34″ mark. Brad nail the board in place, repeat process on other side. Using 2″ deck screws, screw 3 screws on both sides, using the 1″ x 4″ x 8′ boards to sandwich the panel slats. You will need someone on the other side pushing against the opposing board so that your screw sucks the two boards together.
This sandwich should be strong enough to stop any bad twists in the panel slats. It also adds a nice finished look to the panel.


Step 7: Staining (Optional)
If you used treated wood, you will need to give the wood a year to fully dry out before staining. If you used cedar, or other untreated wood, you can stain immediately.
Even if you use treated wood, it is worth staining as it will add another level of protection to your fence, add a rich colour to the wood, and give it a professional look that won’t turn a weathered grey.
Happy building! Hopefully you will love your fence as much as we do!


One Comment Add yours