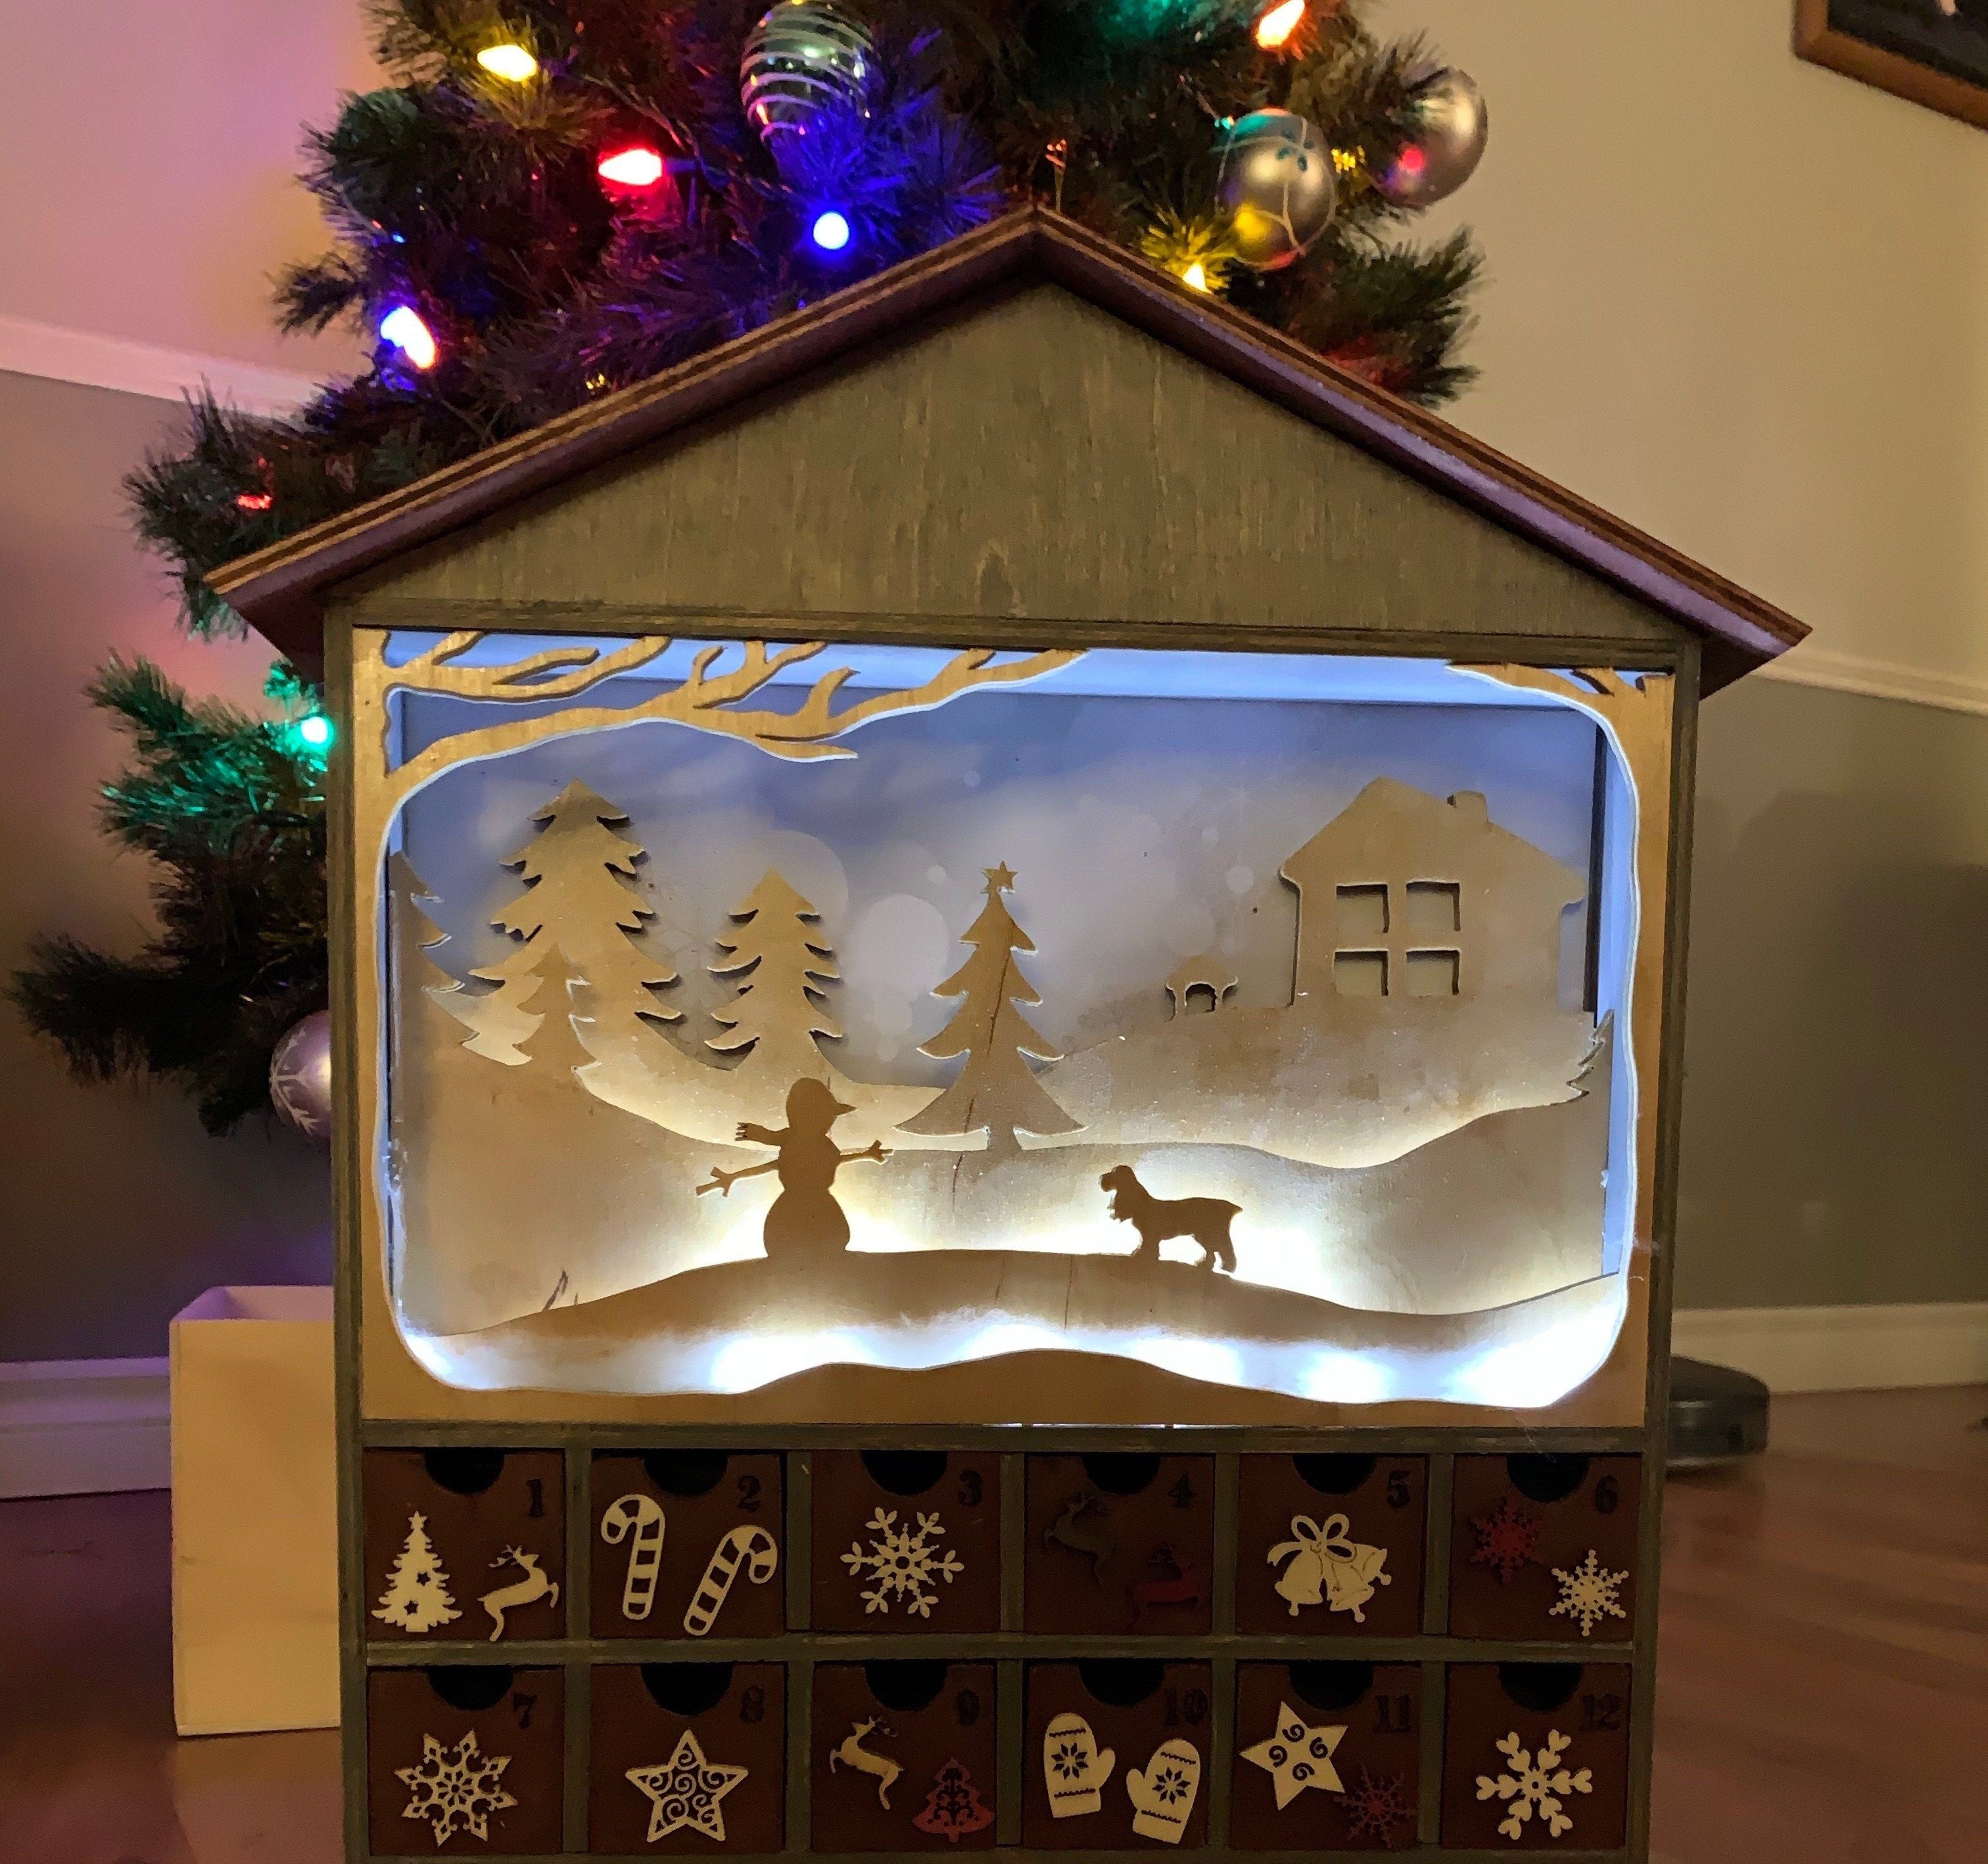
I have been looking at new projects to do in my shop, with a long list of ideas I have curated. Before I could get into those, I had one more advent calendar I had to make (I promise this post is not about another advent calendar!). It is an advent calendar for dogs, and this one is an early Christmas gift for my grandmother who gave me the idea. She had seen a company that were doing dog advents but they were the cardboard pop-open ones.
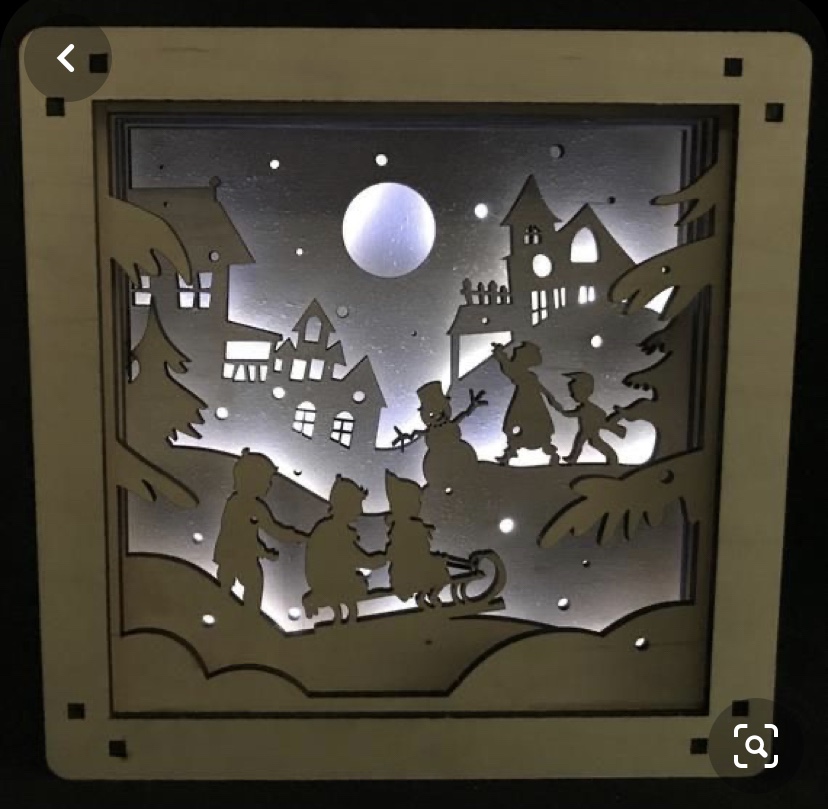
I was having trouble deciding what to put in the main “scene” area because I wanted to make it reference her dog, but also wanted it to be a display piece. I had thought about putting a picture of her dog Gabby as the backdrop and then adding a dog silhouette with a Christmas tree in one corner, but I didn’t love that idea. So, I decided to try out one of my shop-list items, a shadow box. I had been looking at all sorts of styles and thought it would be a good time to give it a whirl. I also thought my grandma would like that it lit up.

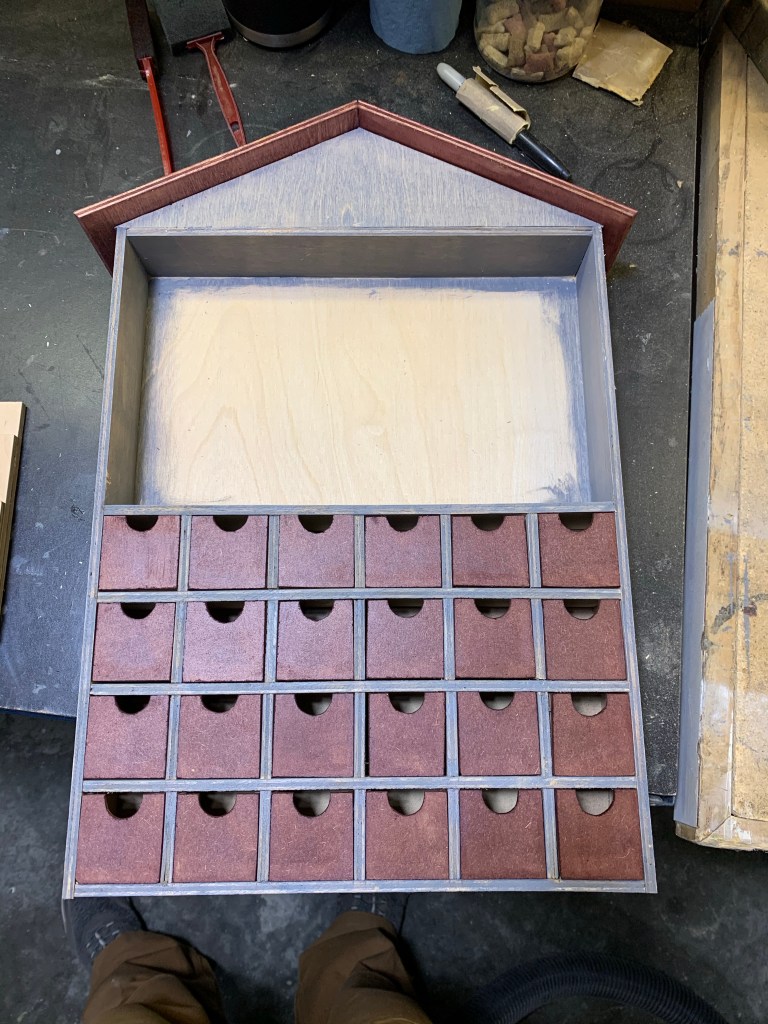
The space I had to work with was 11 3/4” wide by 7” tall by 2” deep. Perfect for a little scene to fit. I didn’t have any strip LED lights on hand, and wouldn’t be able to order them in time to drop it off to her by Dec 1, so for this one, I used some battery operated mini-lights. They certainly did the trick, but posed a design challenge for me later in the build.
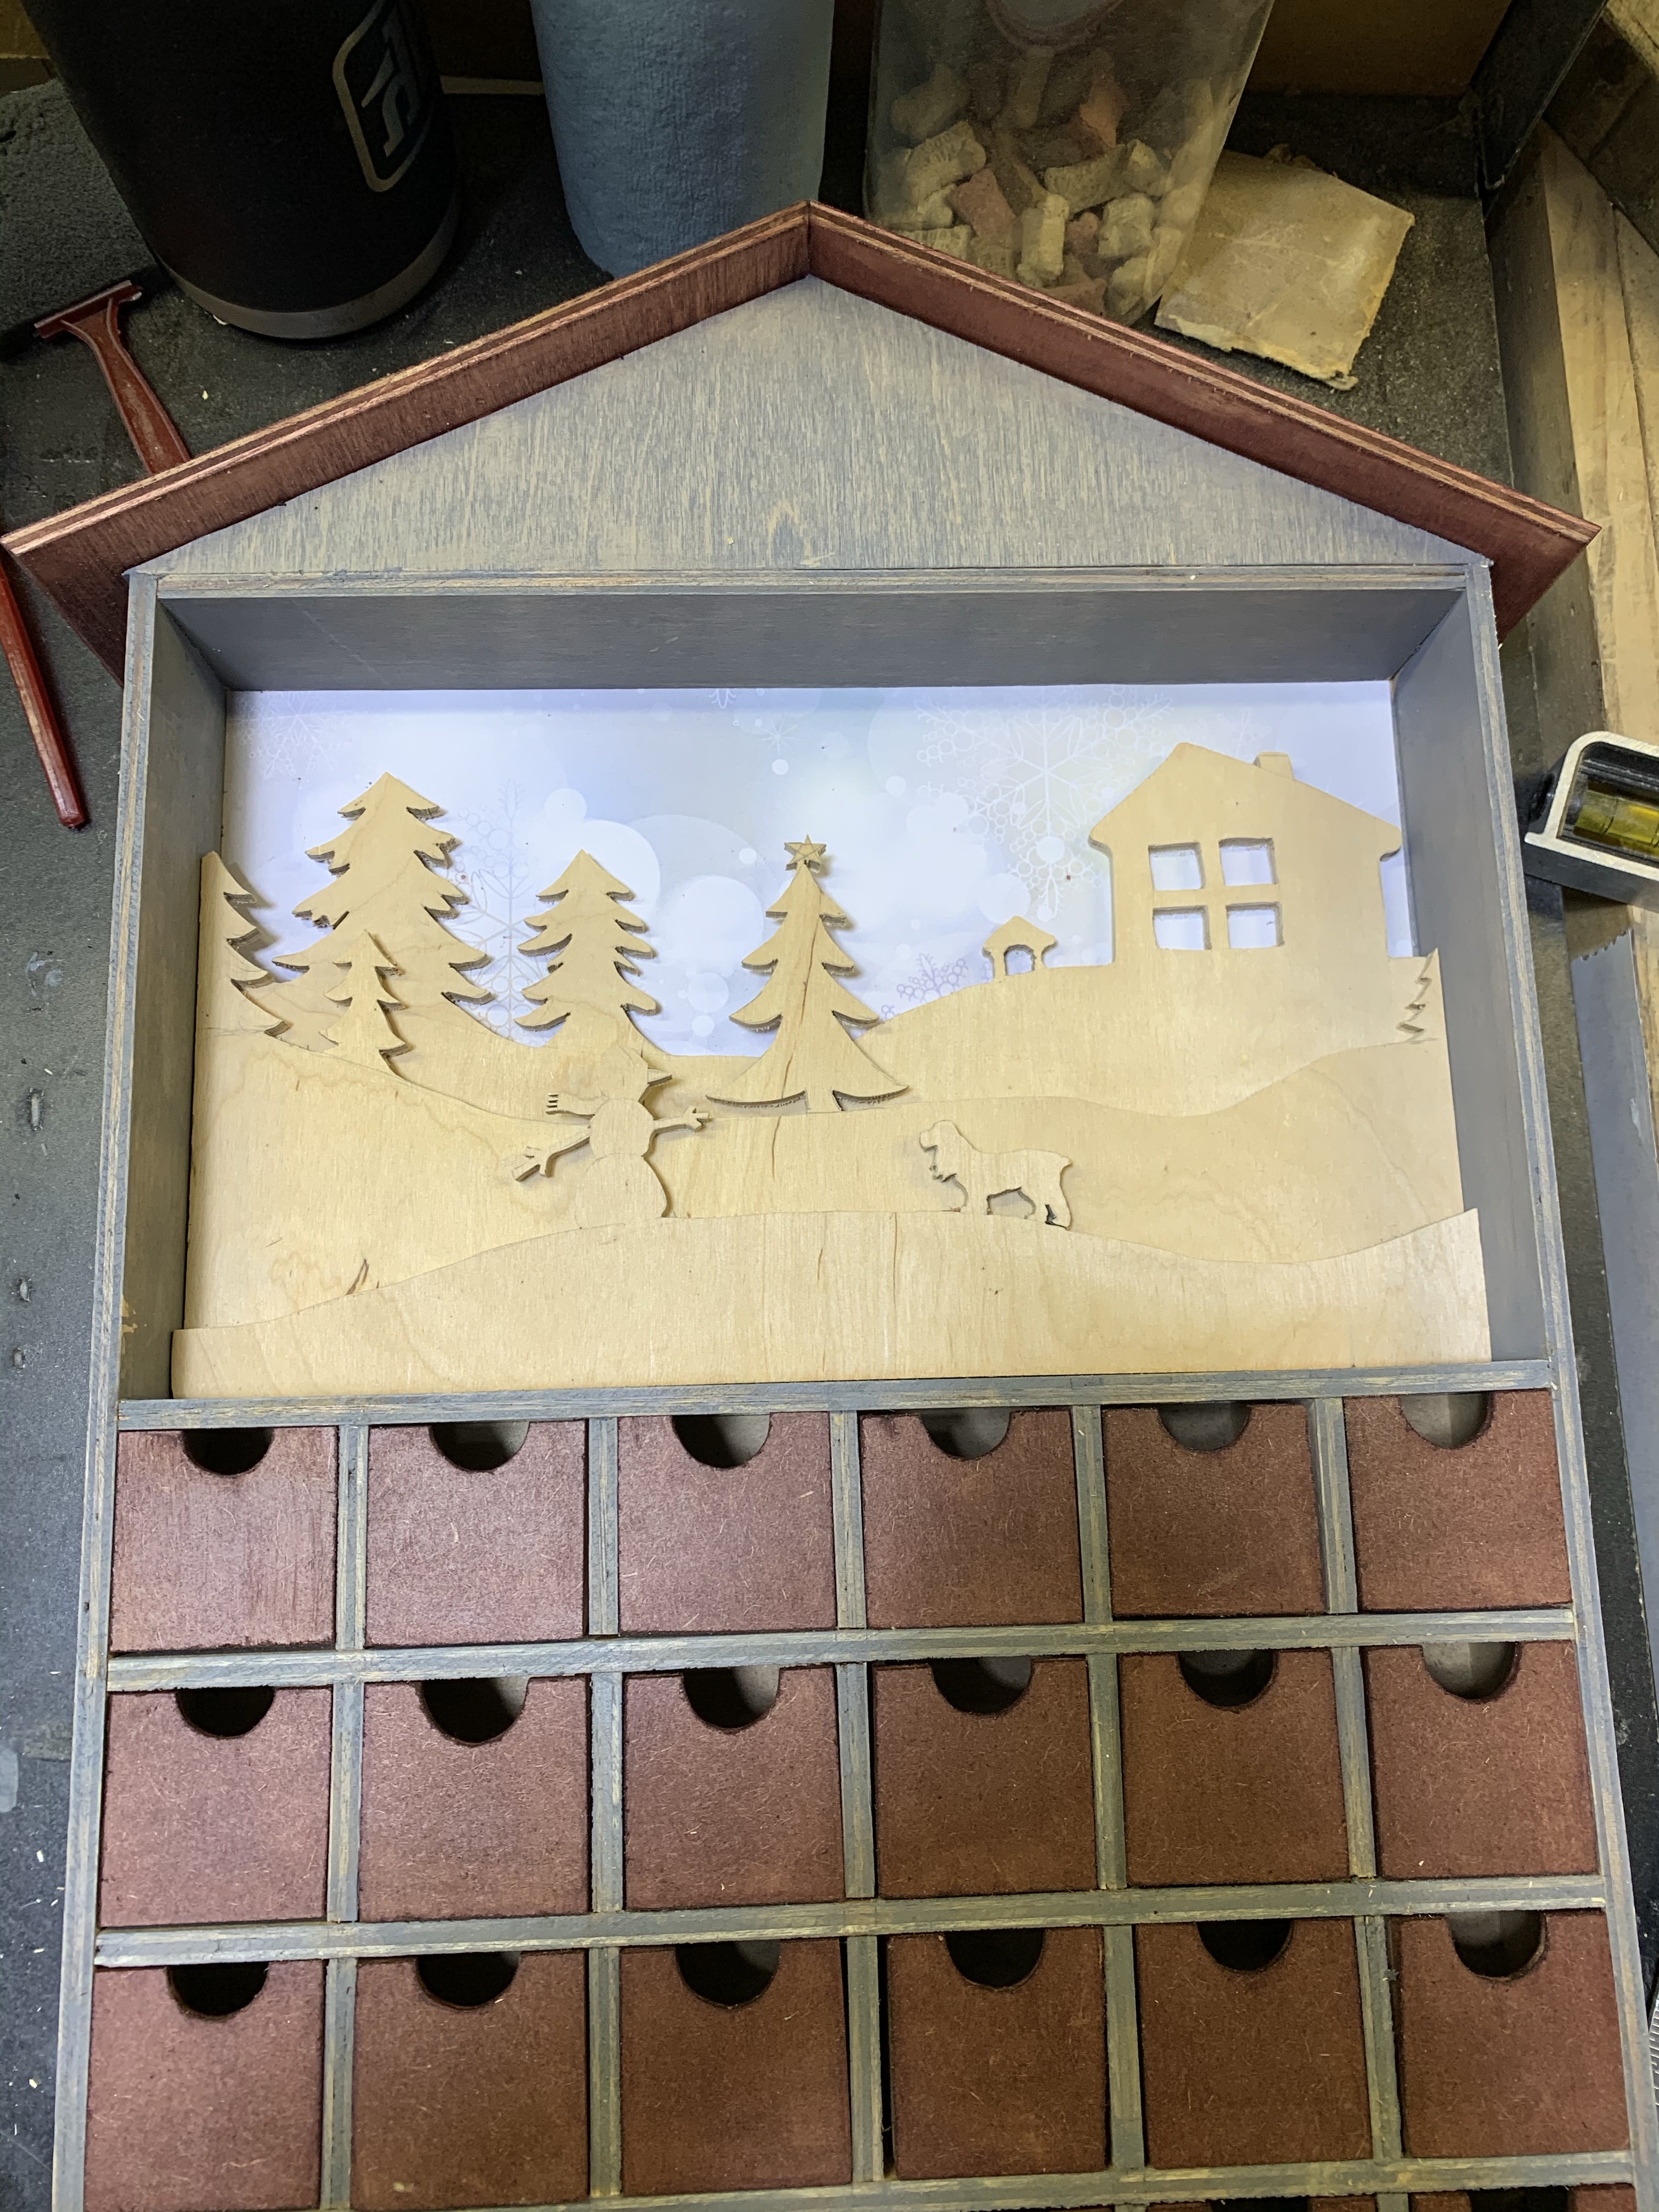
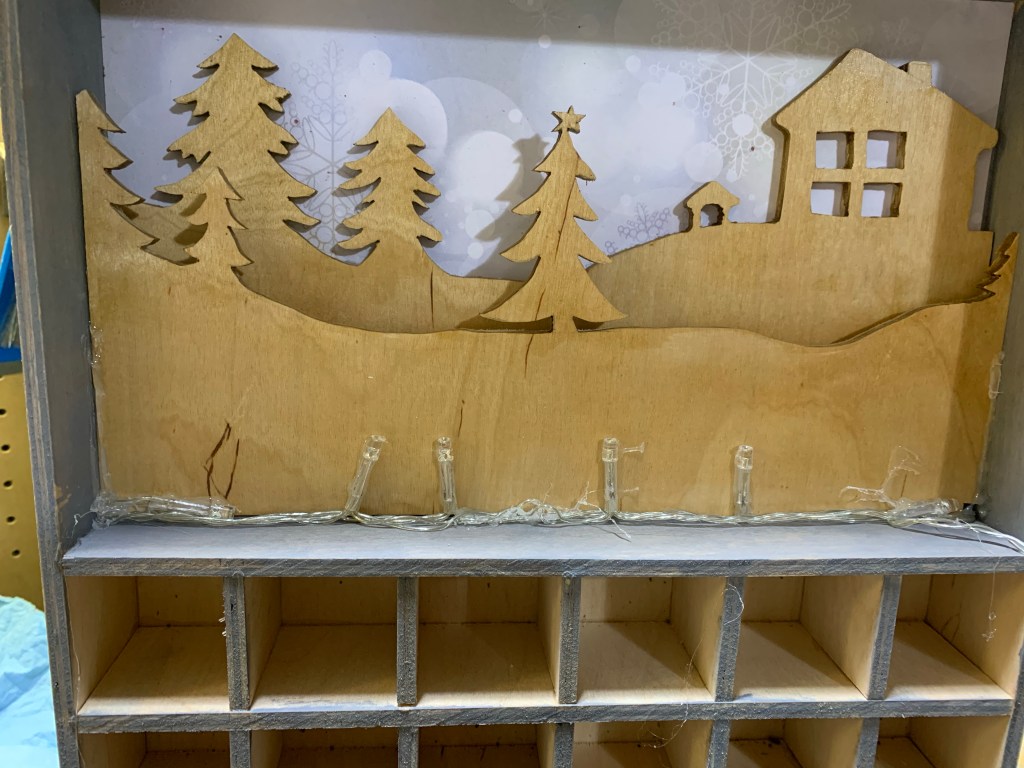
To get started, I had to come up with a scene. I knew that I wanted to incorporate Gabby, a cocker spaniel, so she was my centrepiece. From there I thought it would be nice to have a house with a little dog house beside it, cabin style in the woods. I wanted one of the forest trees to be a Christmas tree with a star on top. And I wanted a snowman to be hanging out with Gabby to add a little more of that Christmas feel.
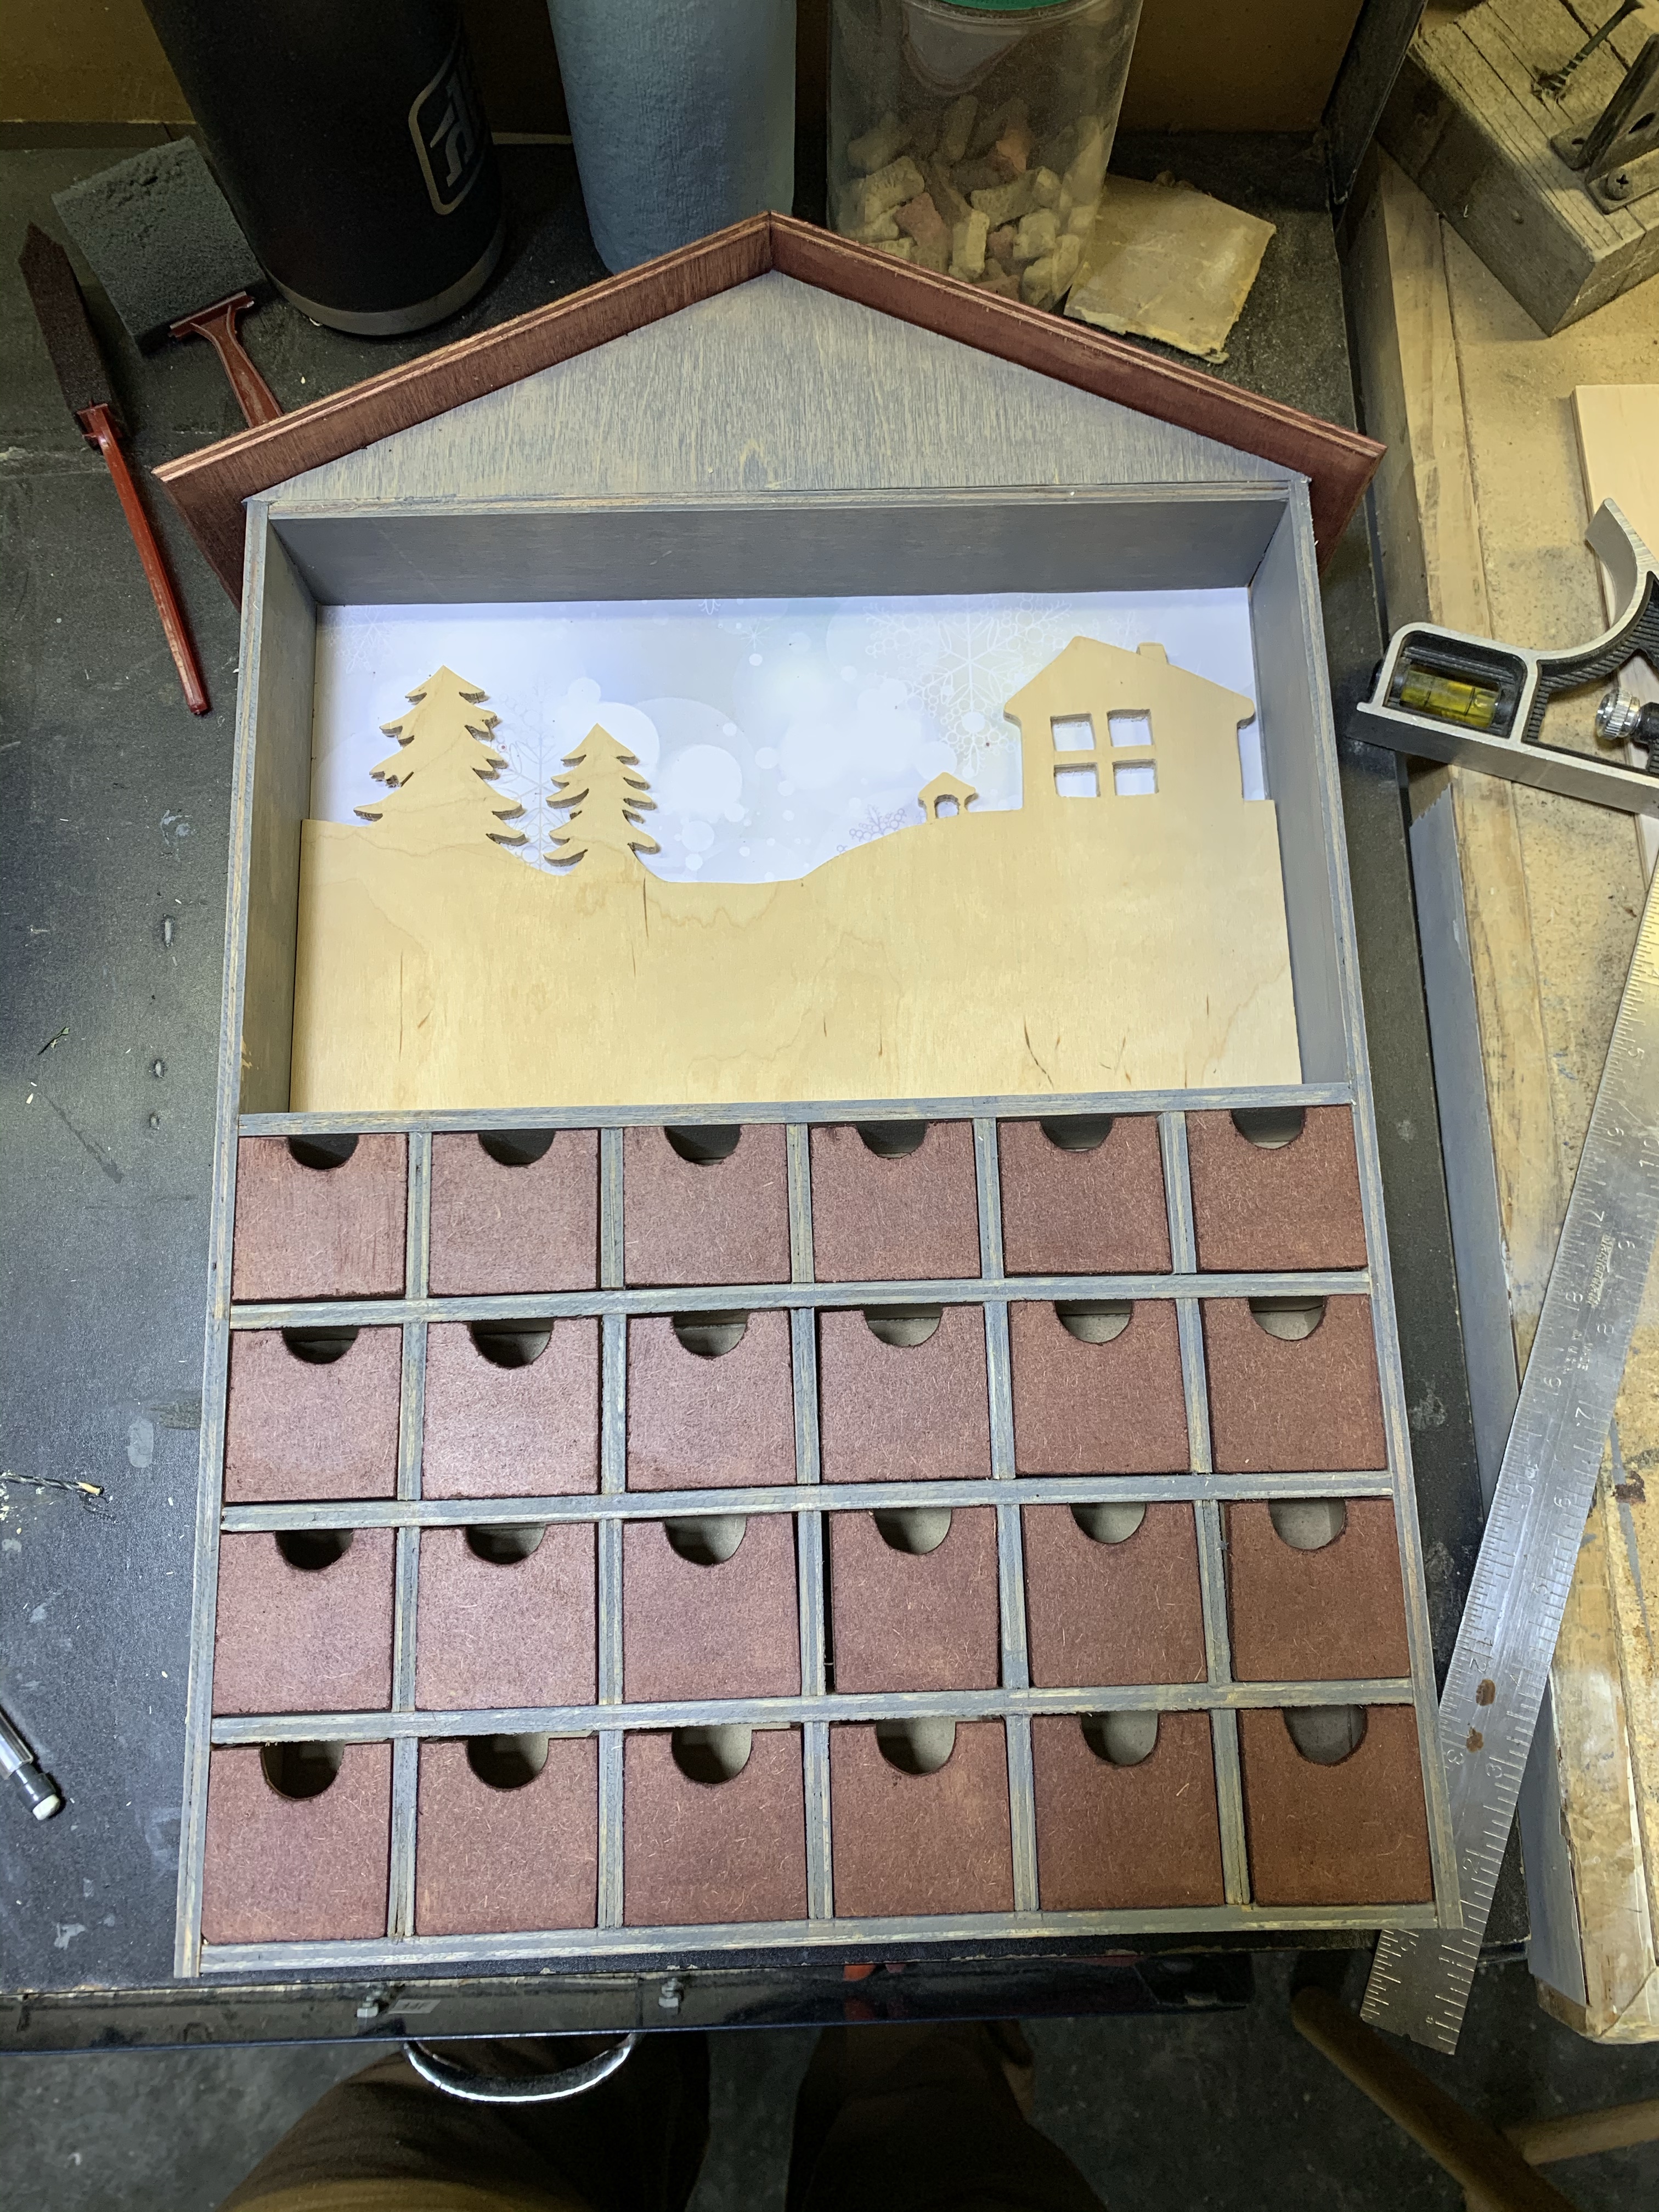
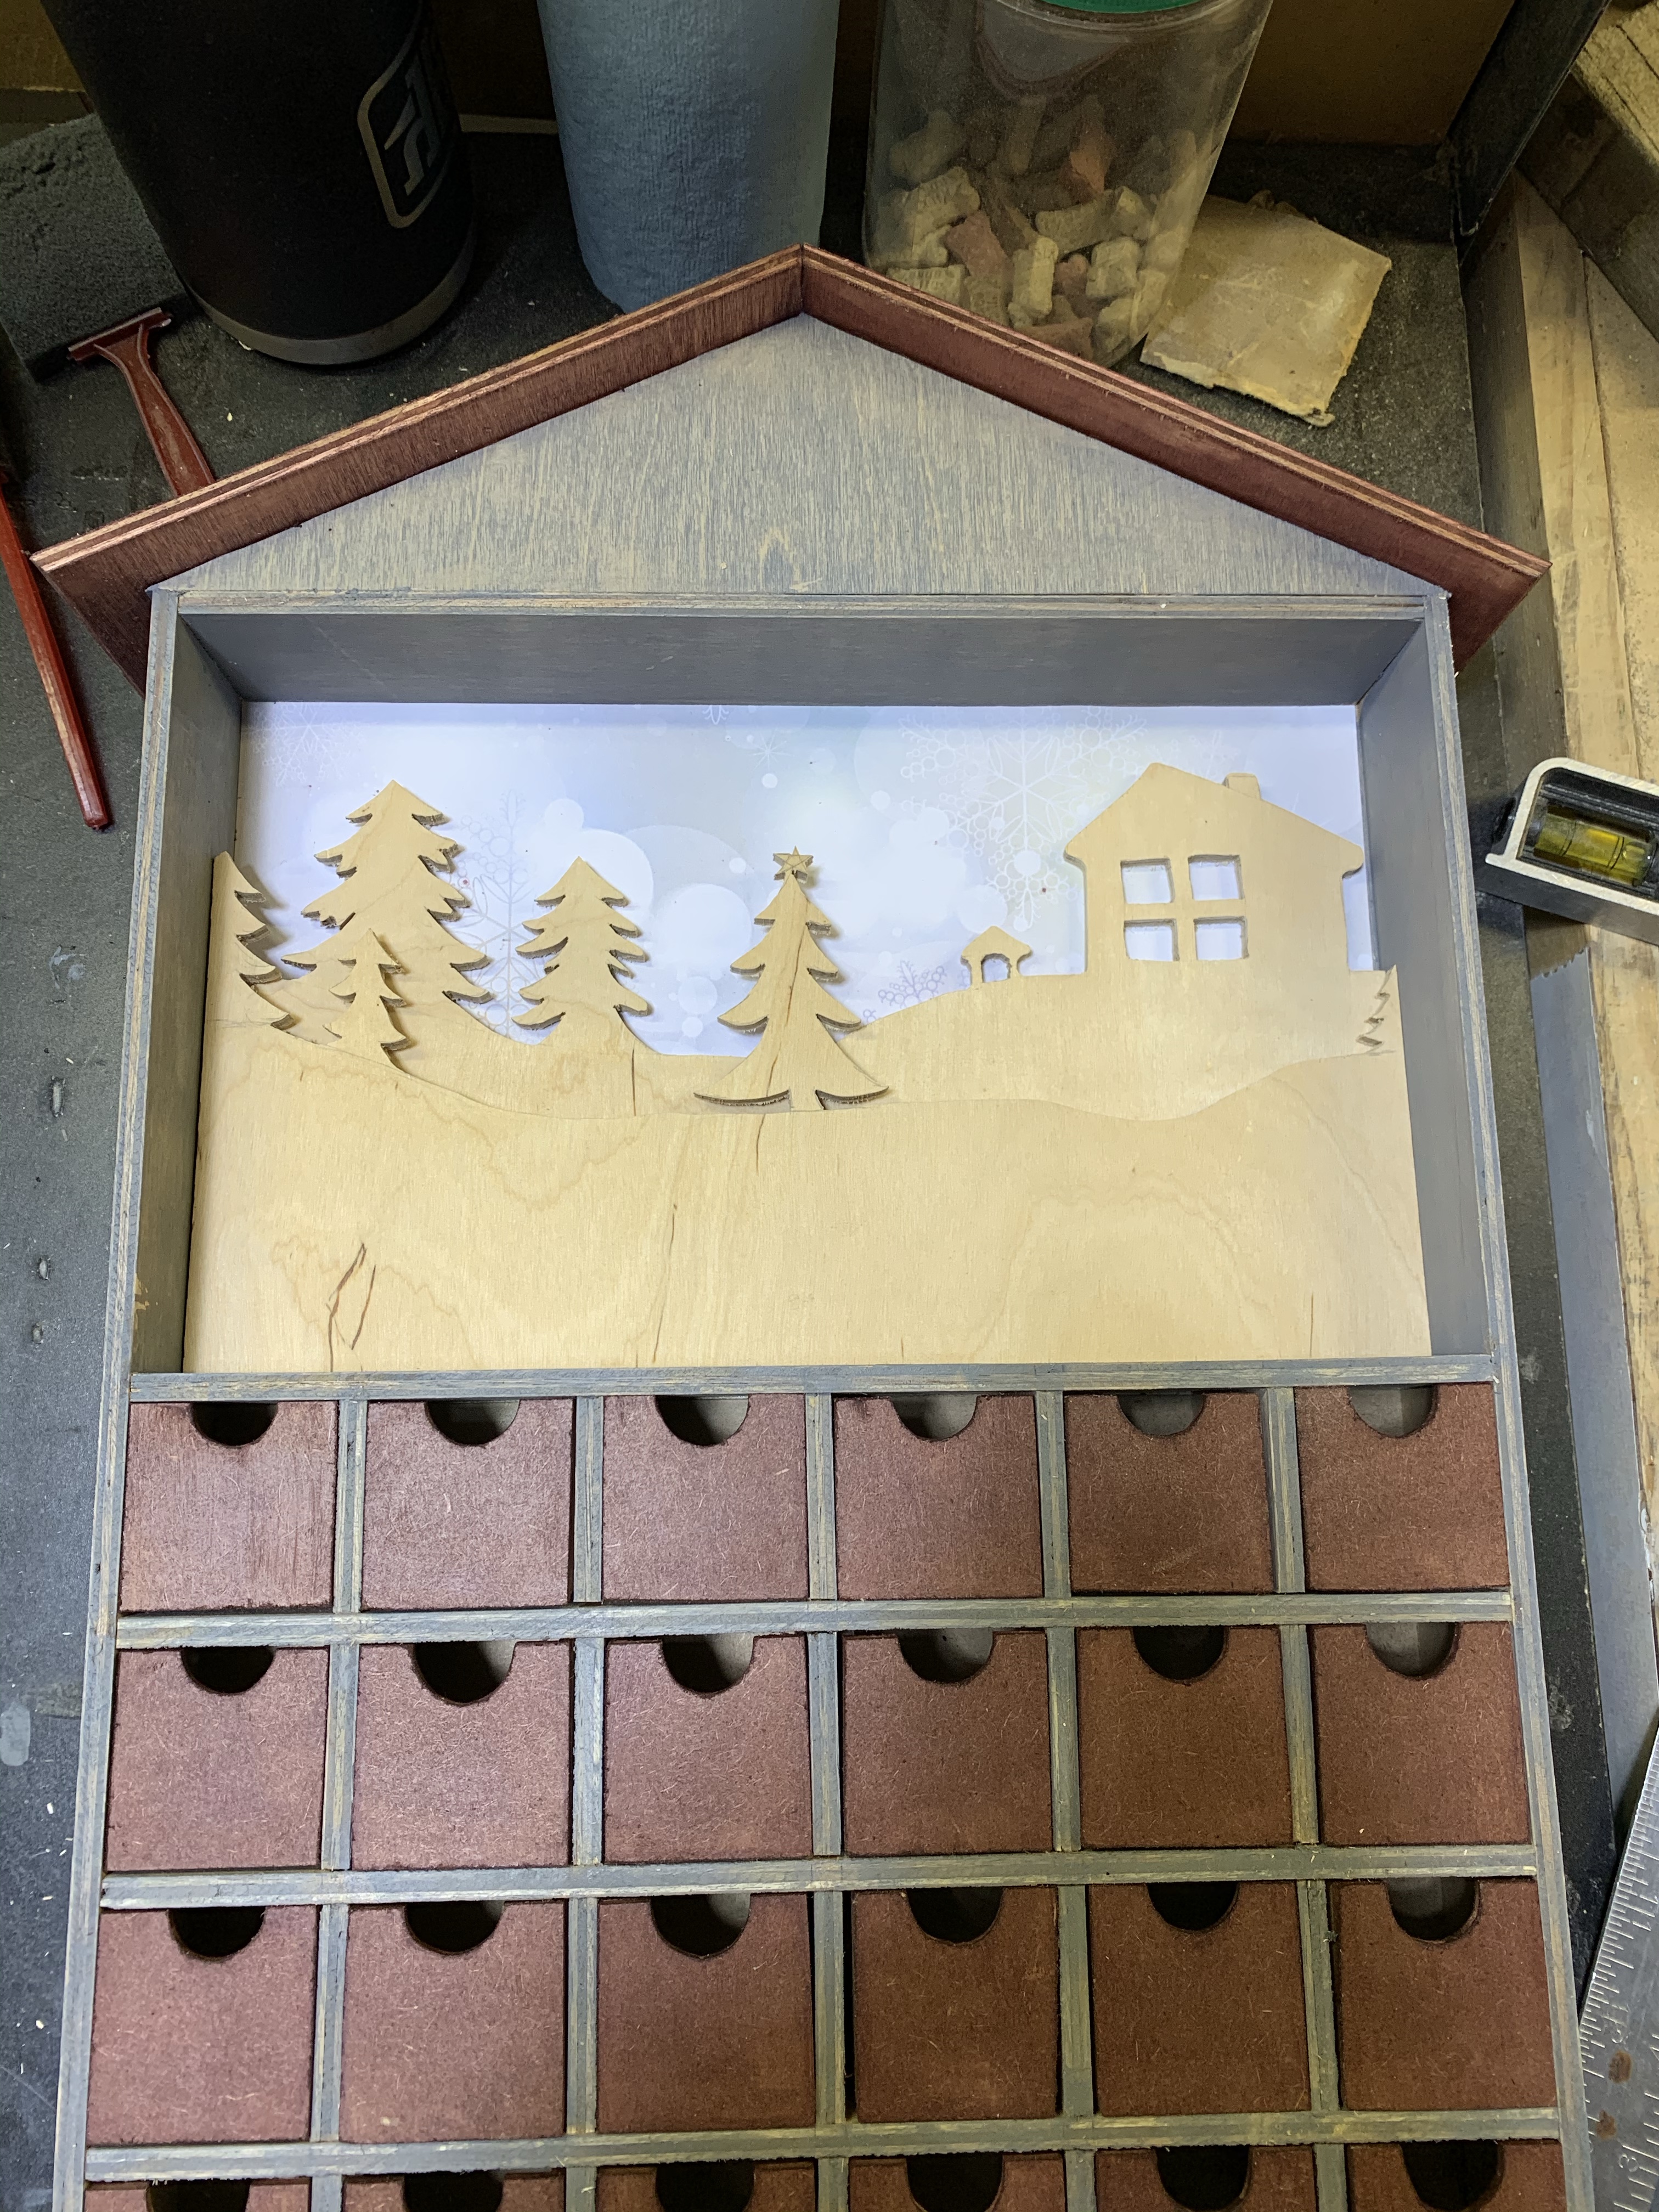
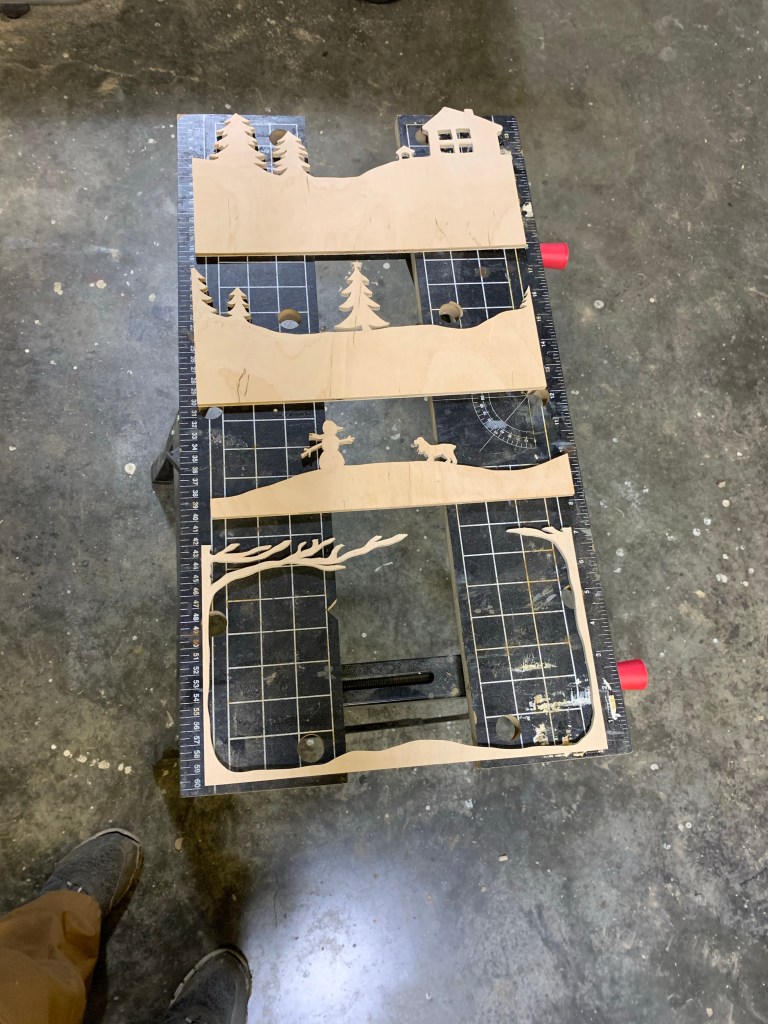
I cut my layers out in different heights. The back height was 6-1/2”, the second height was 5-1/4” and the third one was 3-3/4”. Once I had my levels cut, it was time to start drawing the scenes. I kept the back scene at the top of my 6-1/2” height so that it would stay high in the background. Once I had drawn the back one, I could use measurements from it to ensure my “ground” on the second level didn’t overlap. Trees or other parts of the scene look great overlapped, but the ground needed to gradually get closer to the bottom of the box. I repeated the process with my last scene. The order ended up being the house, dog house and trees on my tables level at the back. The second level was the Christmas tree in the centre with some other trees along the level with varying heights. The third level was the snowman and Gabby, spaced so they were on either side of the Christmas tree.
Once I had the sketches exactly how I wanted them, it was time to cut it all out on the scroll saw. I used a thicker blade for a rough outline of everything, and then switched up to a fine blade for cutting out the detail. The first and third levels had sections that I needed to cut out from within the scene, which is much easier with the fine blade. I used 1/4” plywood, which was easy to cut with the scroll saw. I have been honing my skills with the scroll saw but am not there yet. It was a slow process because I wanted to make sure I didn’t mess up any of my detail. Better to take it slow than to rush it and end up with a headless snowman!

Once I had the scenes cut out I had to add a simple backdrop to the area. I had considered a night sky, but decided on some beautiful snowy scrapbook paper that I had. It worked perfectly for the scene and went with the colours of the advent calendar. Once that was glued into place, I did a quick dry-fit layering of my scenes to see if there were any last minute changes I needed to make. The scene looked great but I felt that it needed one last layer to frame the scene. In my searches, I had seen all sorts of ideas to frame it out and because I was going with a forest scene, I decided on some tall trees with leafless branches stretching across. This was challenge #1, mostly due to inexperience with building these. I redrew this design half a dozen times because my branches would block parts of the first layer, mainly the little cottage house. I finally decided on a sketch and went with it. Unfortunately I wasn’t paying enough attention to the bottom and how it would mask the lights, which was challenge #2. But I’ll get to that.

Once the final layer was cut out, it was time to paint the scenes. I wanted to keep the natural light wood colouring so I used a clear gloss verathane to give some lustre to the layers. The verathane had a slight amber hue to it, which brought out the richness of the grain and added a little warmth to the wood colour. Getting into all the little nooks and crannies of some of the scene was fun, and nerve-wracking since some items were delicate. I was most worried about my snowman arms, so I was very gentle and they held up. It was a little more tedious staining, but it worked. Now I needed to let that dry and soak into the wood.
I took a few hours break to make sure the stain was nice and dry since I was going to be gluing it and didn’t want the stain to hinder a good hold. So, since I was in the Christmas mood, the dogs and I got Christmas setup in the house. K unfortunately was working, but I left all his fishing ornaments for him to add later. It was one of the fastest Christmas setups I have done, so I took the extra bit of time to make some homemade Mac & cheese. So gooey, delicious and warmed me right up before heading back out to the shop. we have a little heater out there, but it still gets a little chilly.

Once back at it, I glued the 1st layer of the scene into the calendar. I let it dry for a few minutes and then drilled a hole in the bottom right corner. This is so that I could thread the lights through. I had left the roof hollow in the back so that the light controller could be glued into place there and hidden from view. Once that had been done, I threaded the full set of lights through the hole. Unfortunately, 1 light was going to have to be mounted on the back, but that is ok. I wanted to make sure there was no slack at the back, so I used the light to glue the cable to the back. Challenge #3. I have been using gorilla super glue to assemble these boxes and it is fantastic. Dries quickly and has an impossibly strong hold. Unfortunately the light is the glues Achilles heel. I had a bunch of them that I was about to clue into the scene, so I had to come up with another option. My next idea was contact cement, but alas, I was out. So, I pulled out the handy hot glue gun. Worked like a charm. It allowed me to make an excellent seat for the light and it cooled quickly so that I could move onto the next light. It also held up to me tugging to ensure the wire was nice and tight.
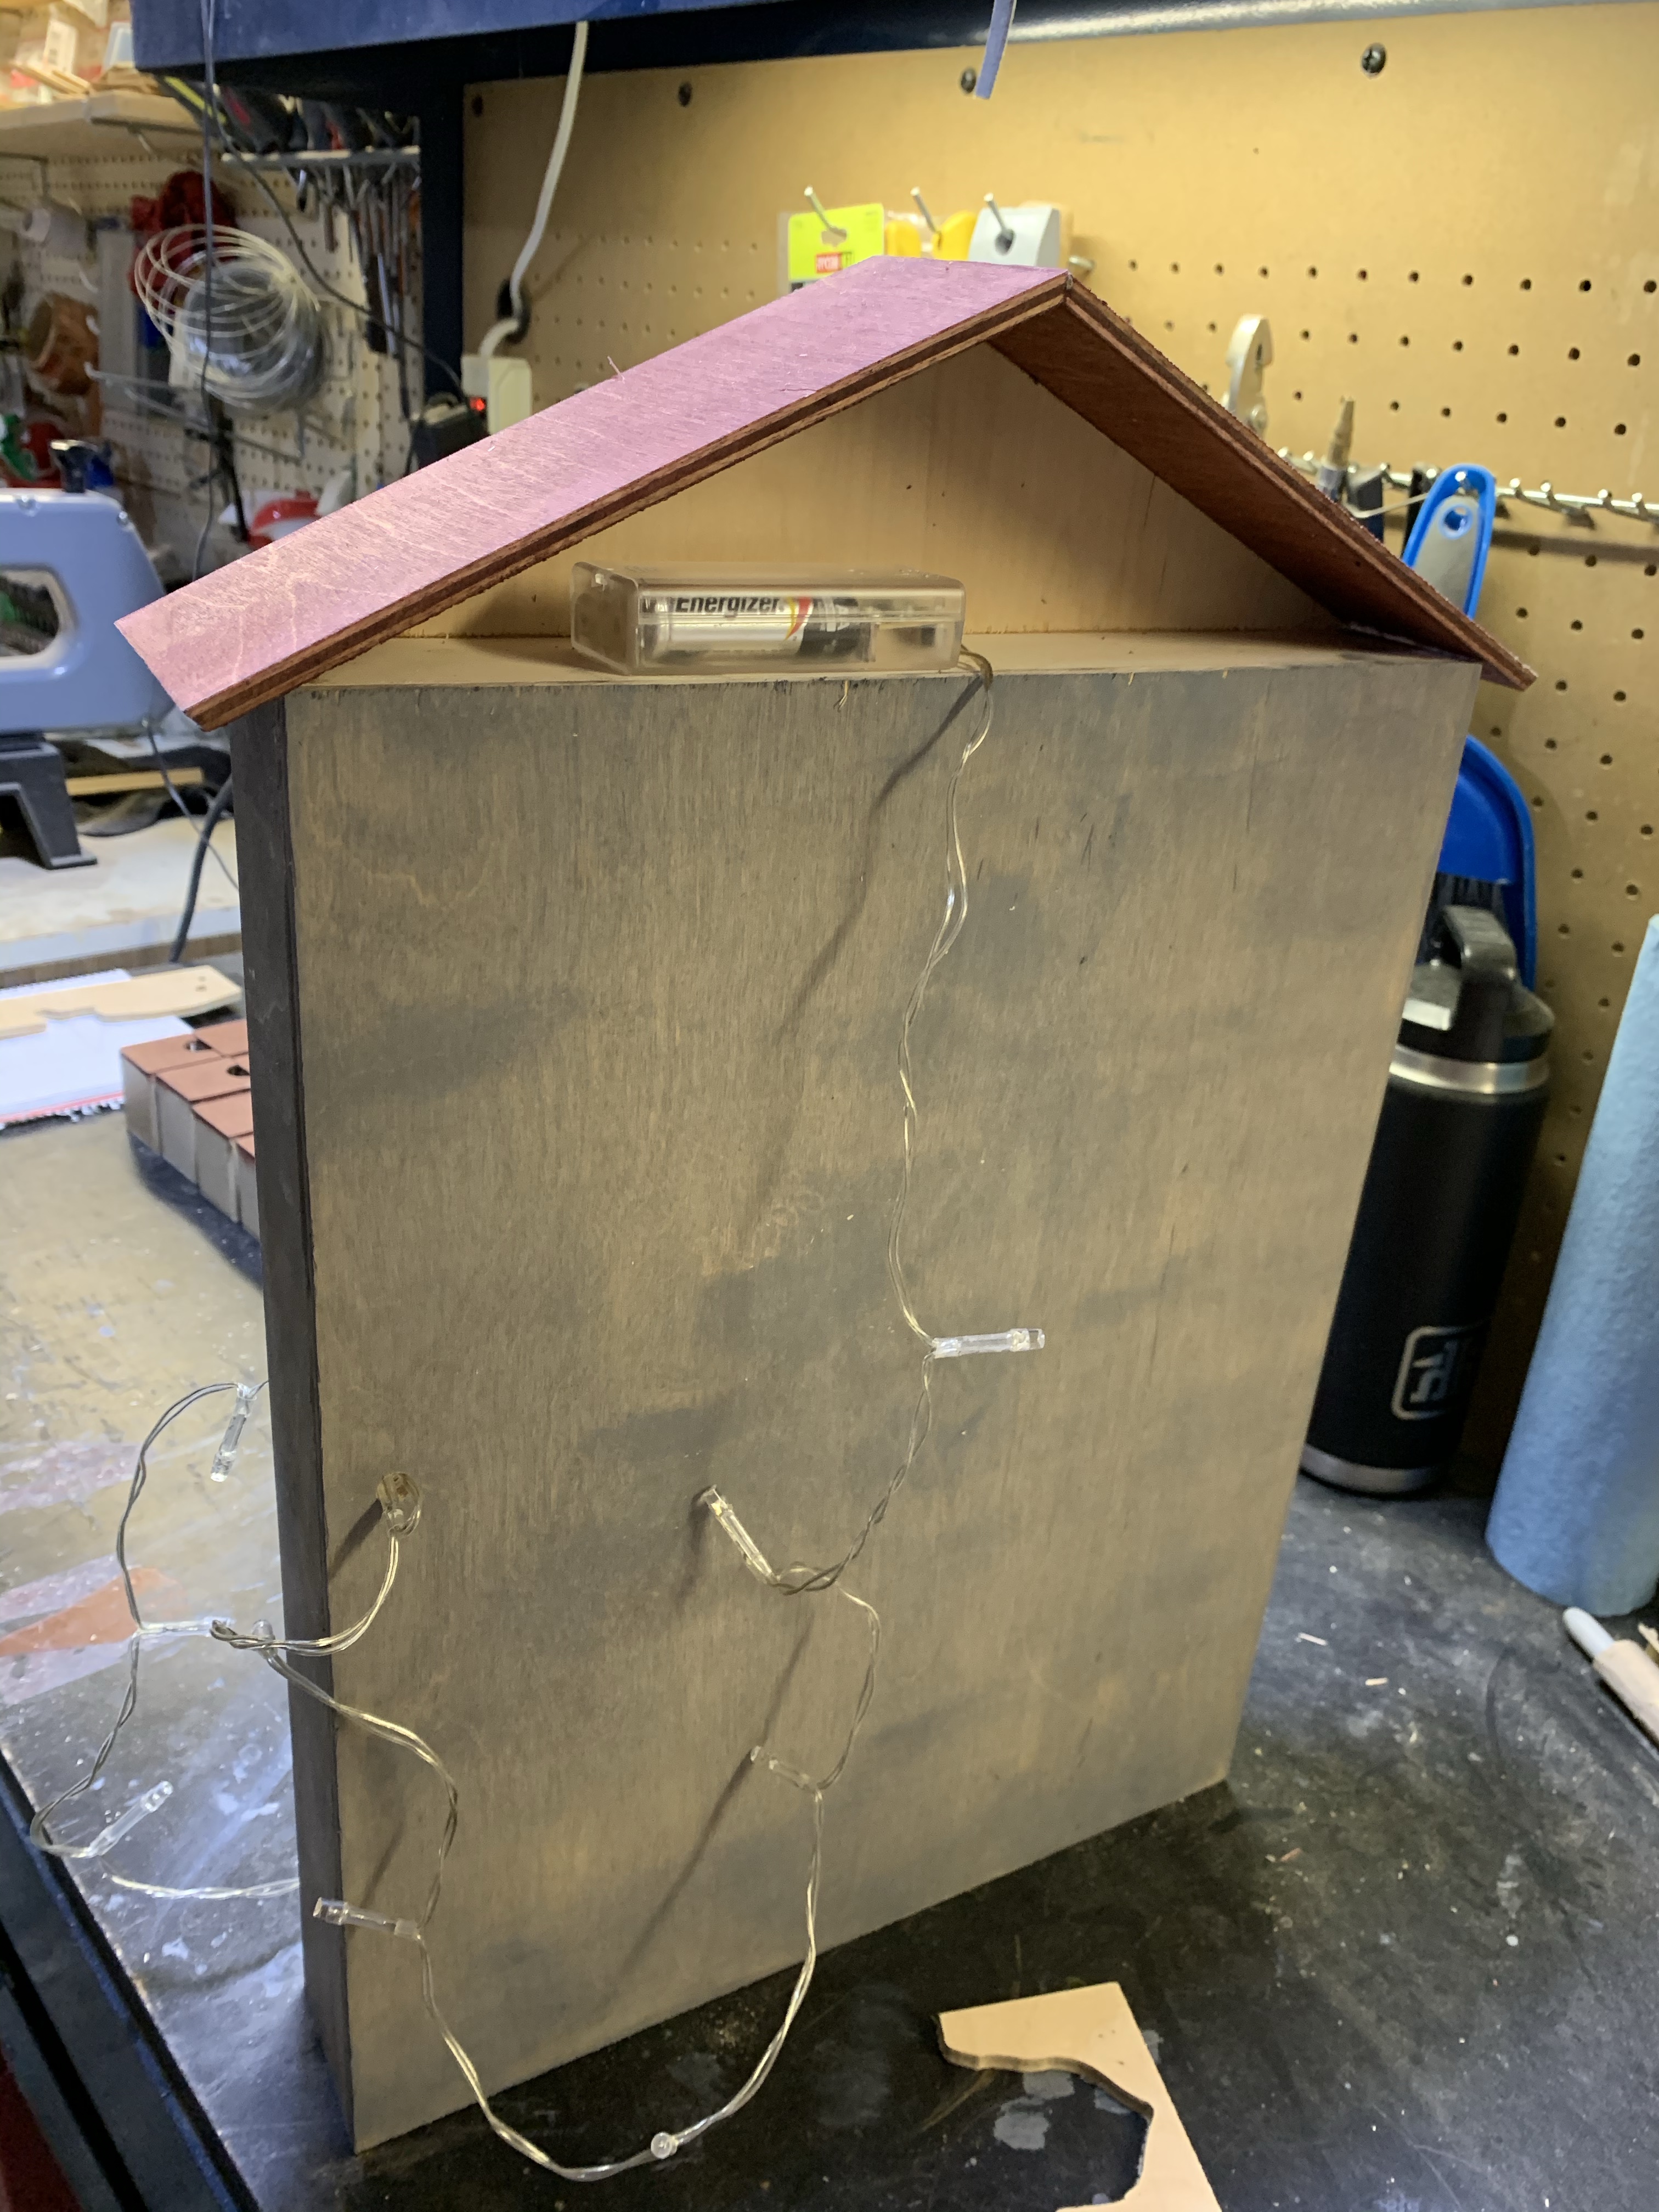


For the first layer, I had all the lights facing up. If I were to use these lights again, I would actually mount them part way up that layer so that more of the glow shows. It still turned out great, but it would be a minor adjustment I would make. The string was also quite long with the lights spaced, so I did a double layer, making sure the lights were nicely distanced. I also added some glue along the wire to make sure it was nice and clean and held tight along the bottom seam.
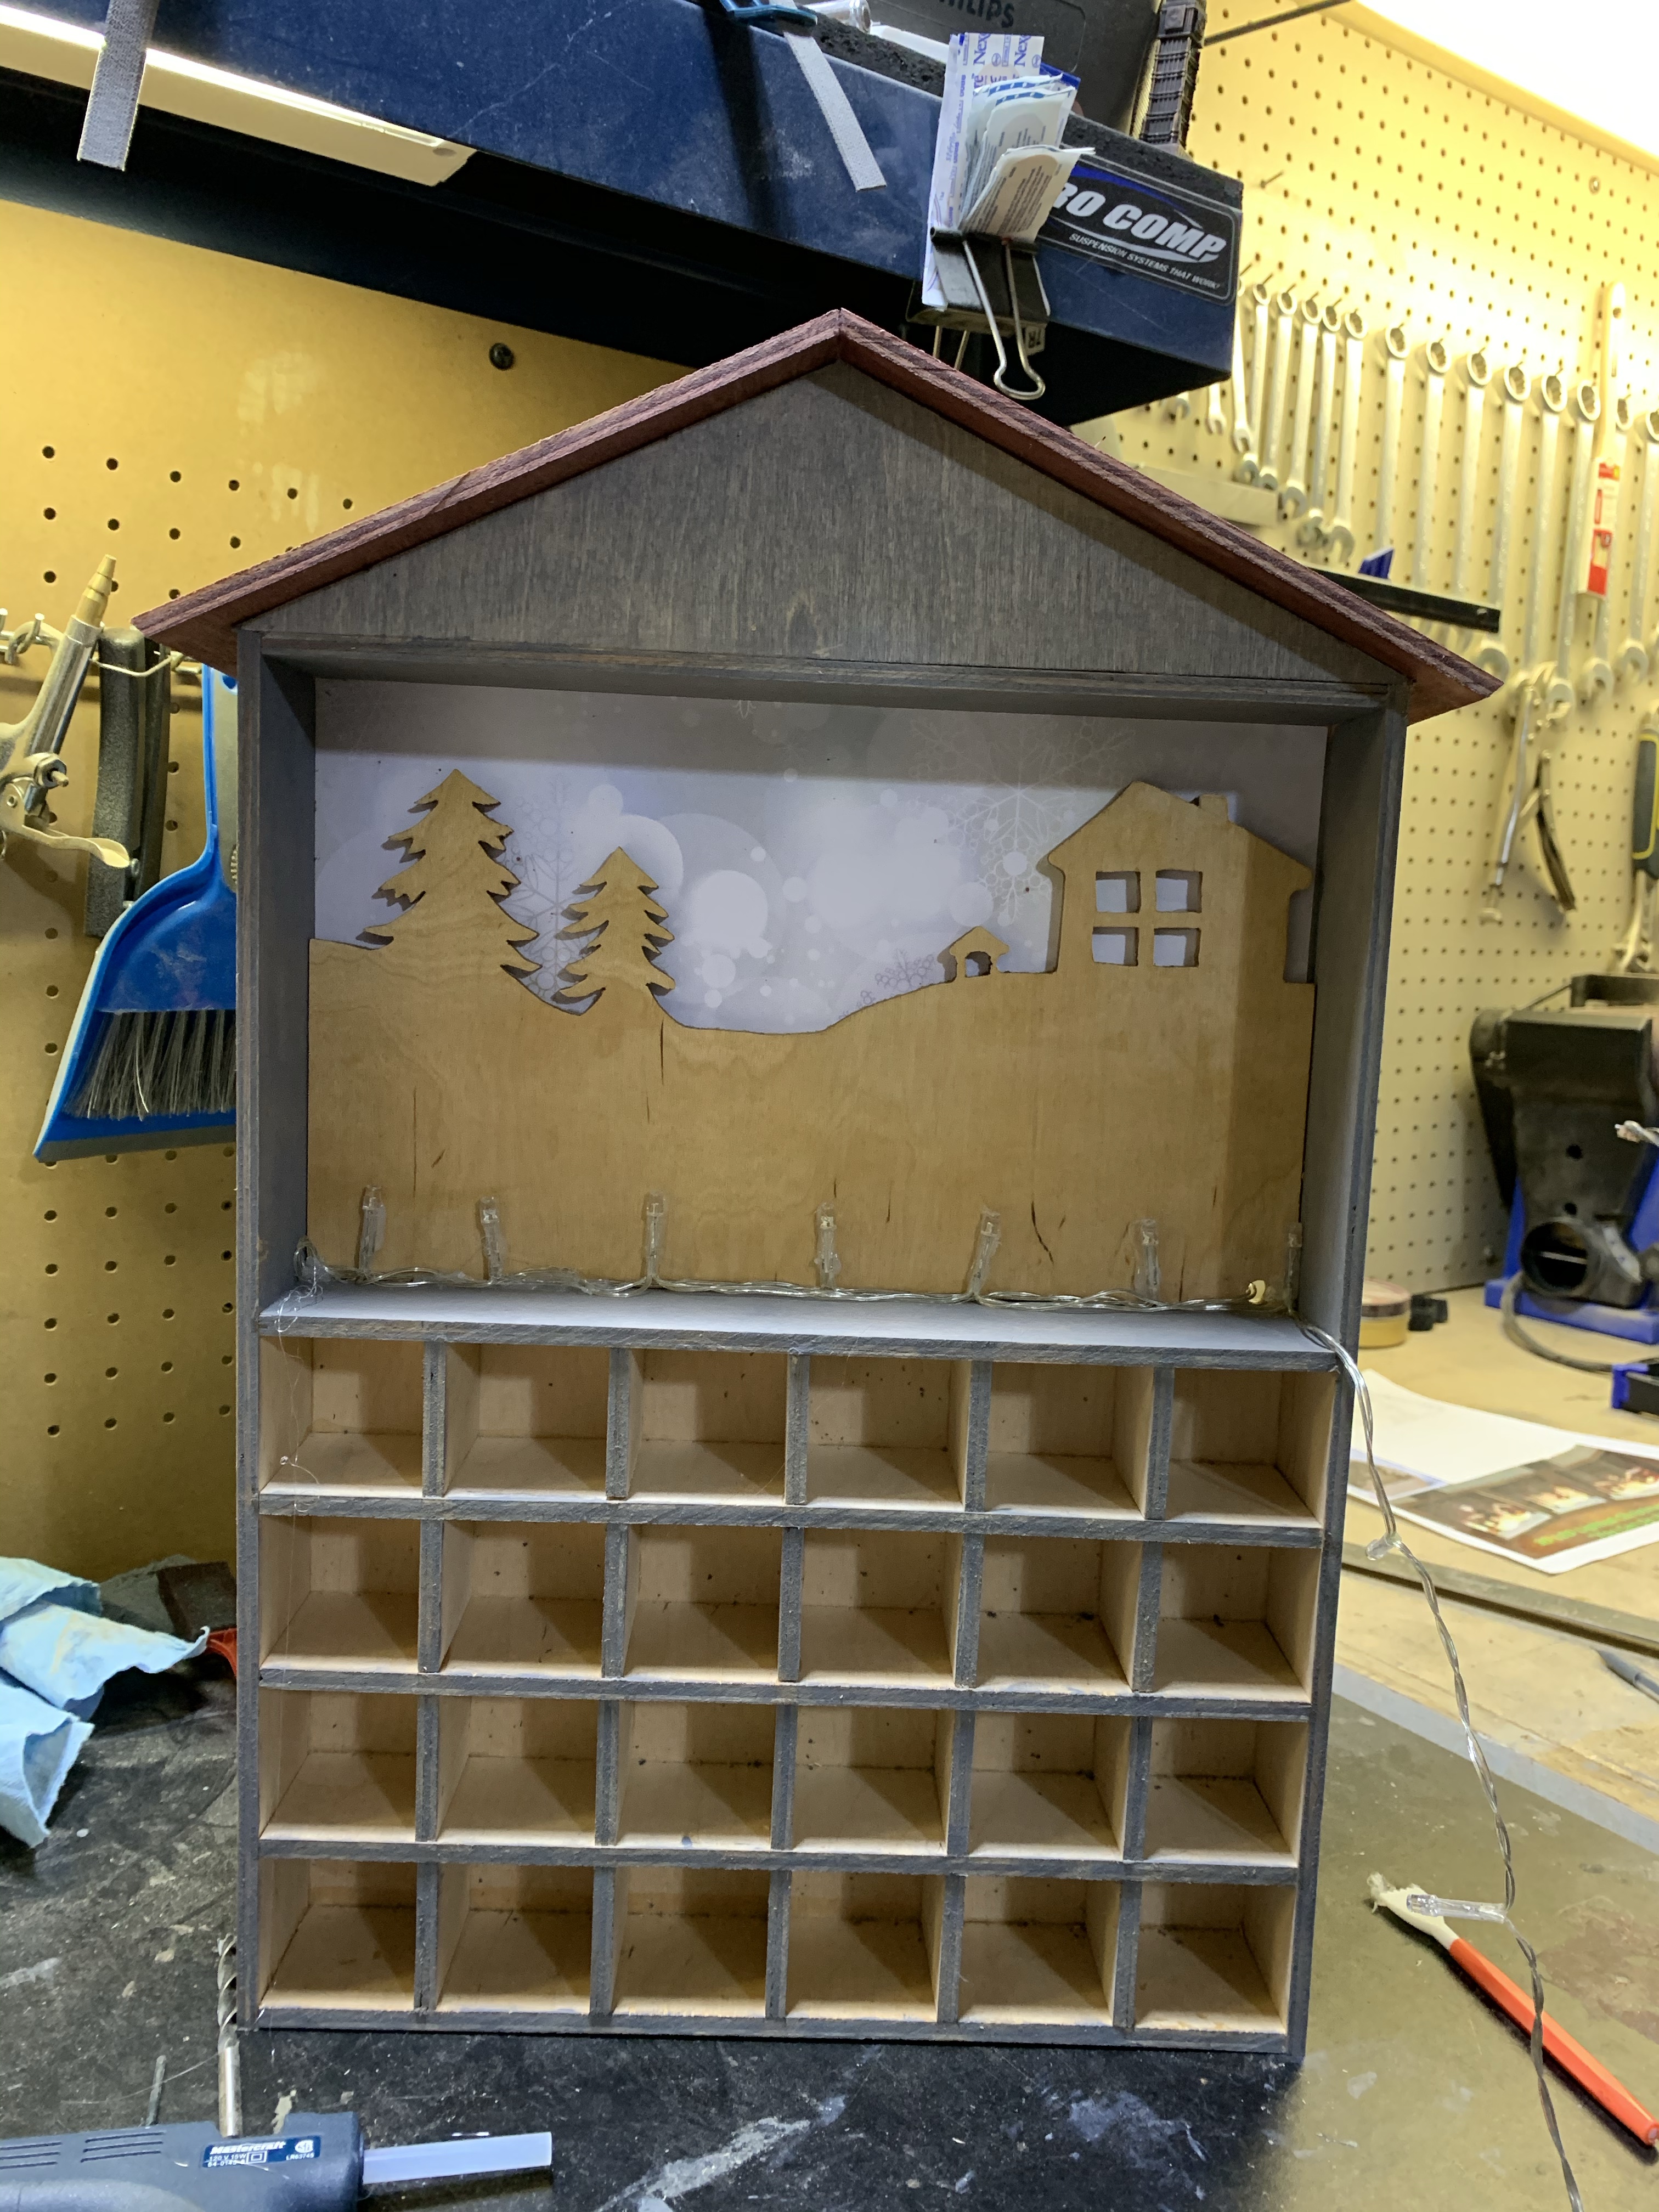
Once done, I notched the bottom right corner of the next layer and repeated the process. I was luckily paying attention to the height of my next layer and laid the light on either end of the scene on its side. Had I put it the same as the other, it would have peaked out above the ground of the second layer, which wouldn’t have been good.
The third layer also got a notched right bottom corner for the lights. All of the lights on this level were glued on their side. Here is where challenge #2 rears its ugly head. When cutting my frame layer, I hadn’t considered the width at the bottom needing to be consistent to hide the lights behind it. I had gotten overzealous with my design and sure enough I had a peek-a-boo light. I considered re-cutting the entire layer and then realized I had used my last piece of plywood. I sat and thought about it, seriously considering giving up for the evening and grabbing another piece of plywood the next day, but then I had an idea from my earlier decorating. Add some snow! Since it is the outermost layer, I decided to add some cotton batting over the lights, hiding them and adding to the winter-feel of the scene. It worked great, and also helped mute the brightness of the front layer of lights.
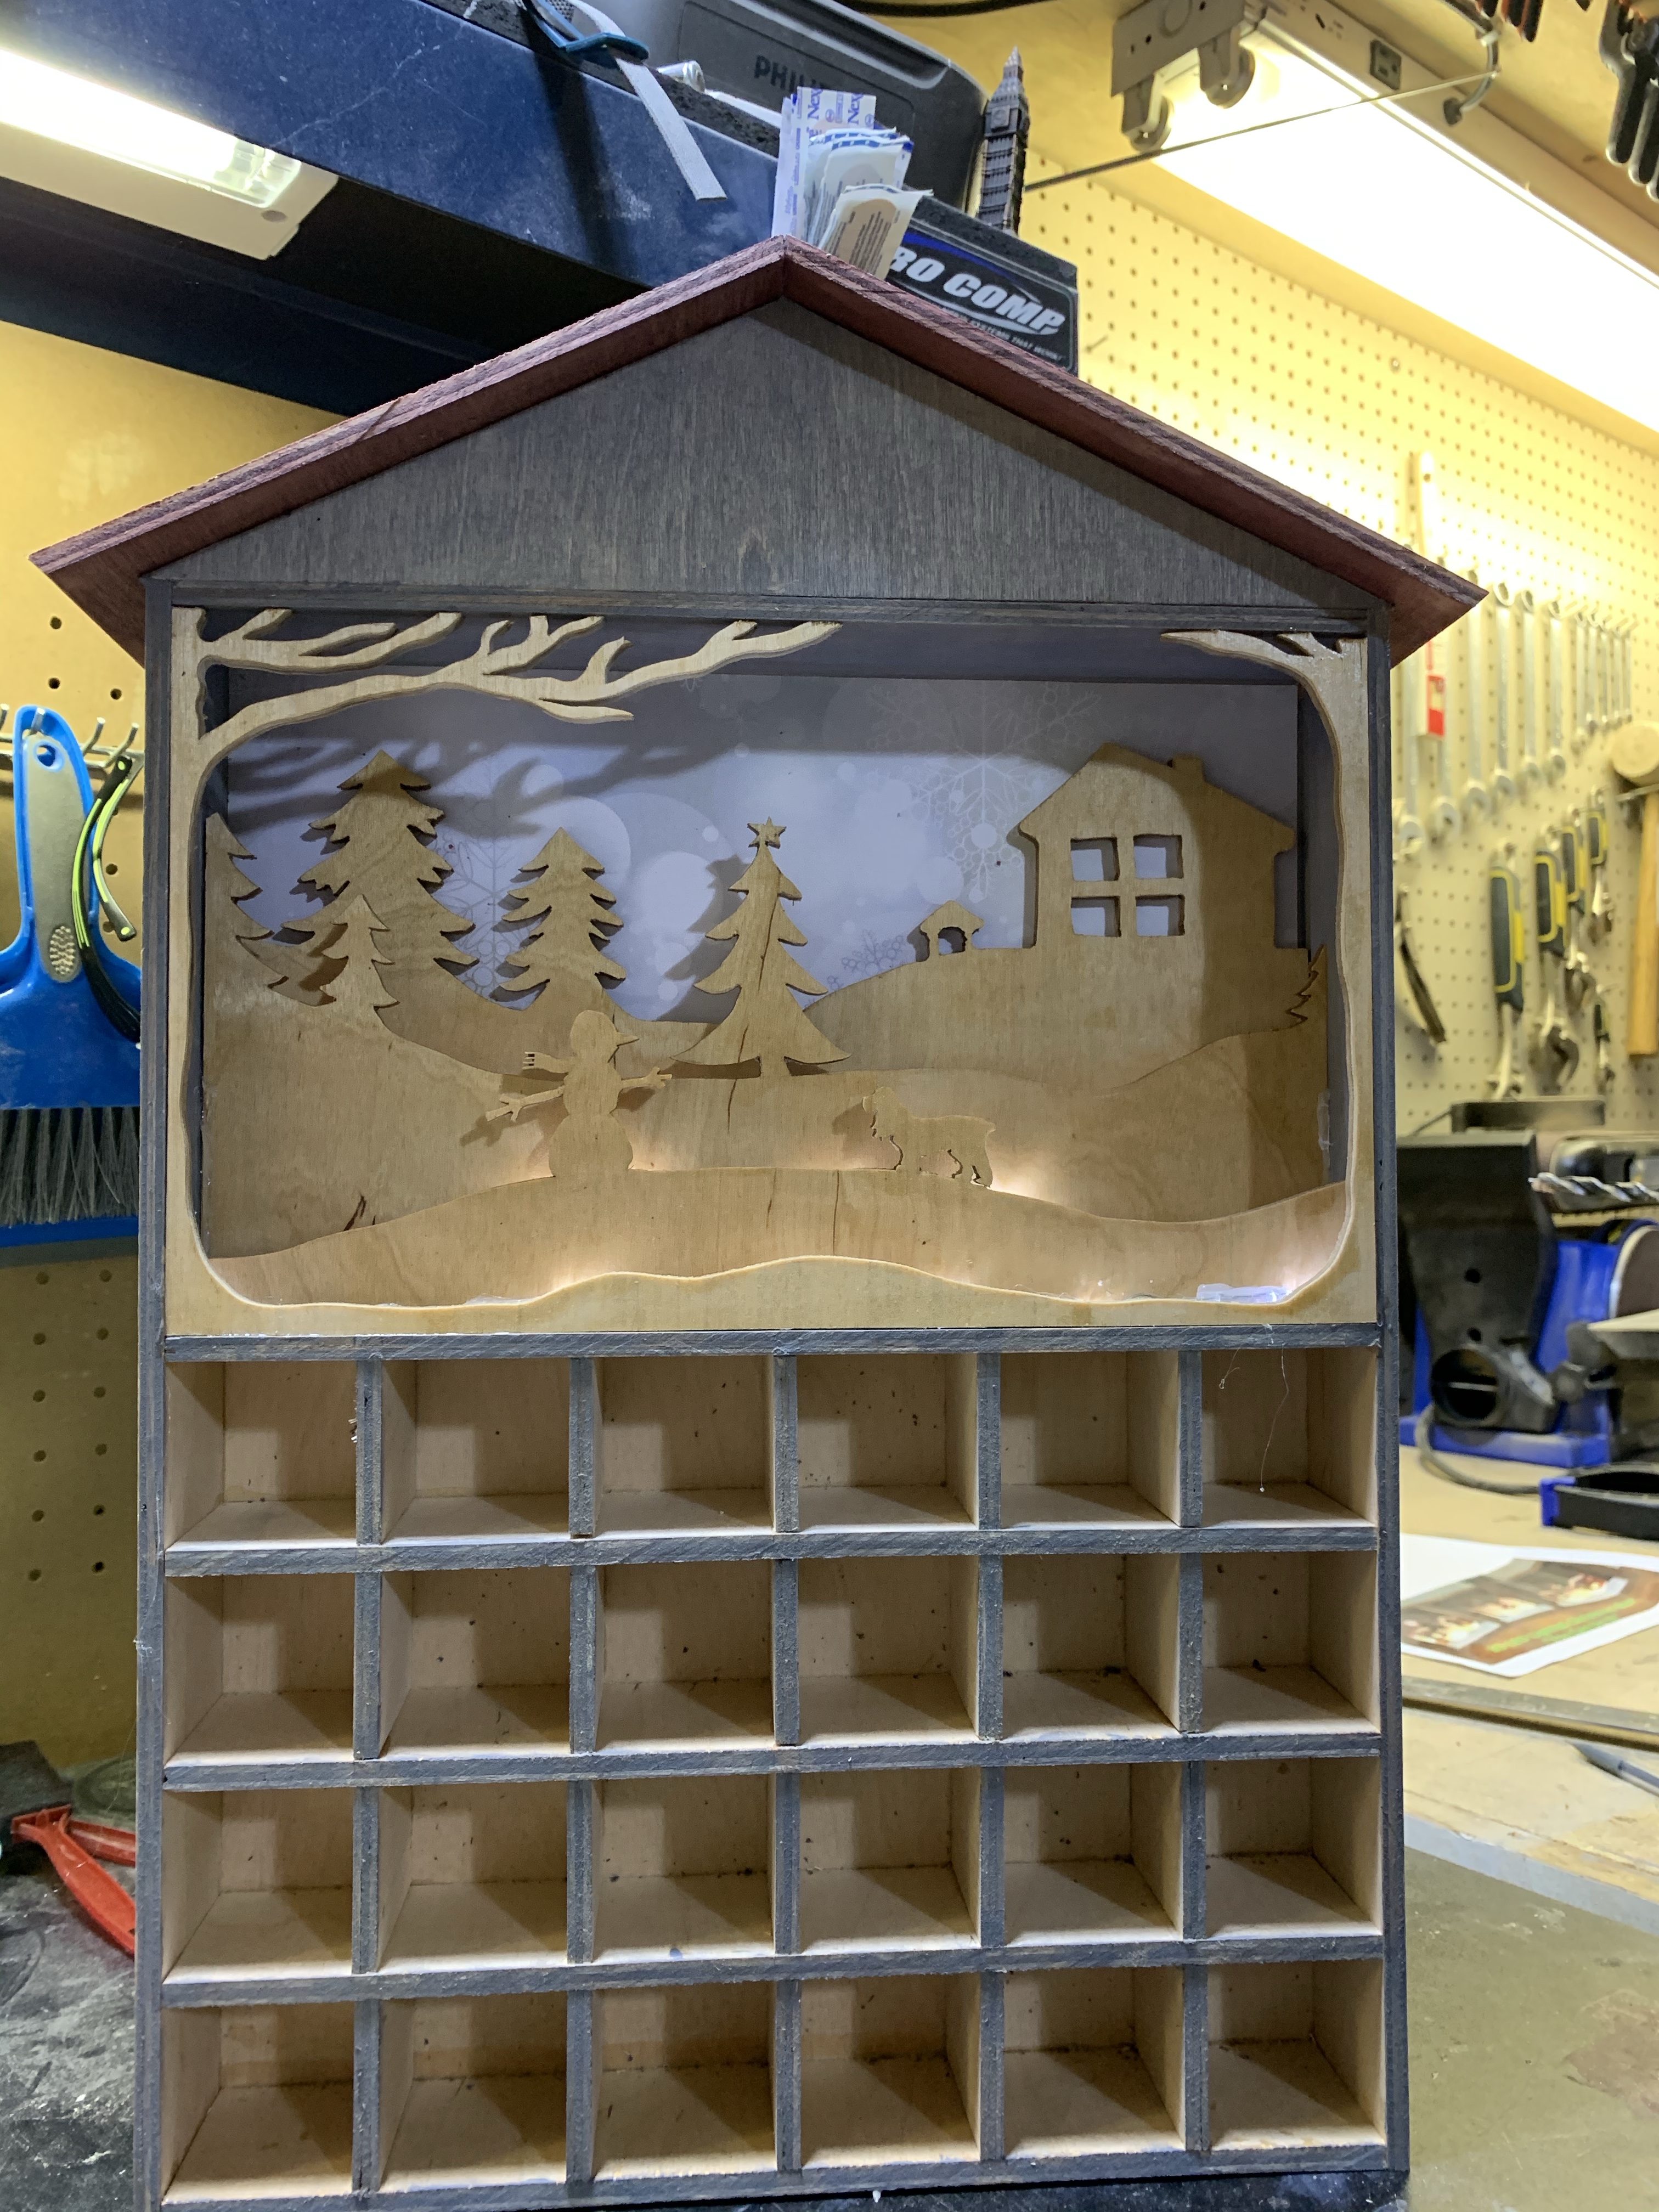

I took it inside to finish wood burning the numbers and gluing on the box embellishments. Then, I shut off the lights in the dining room to see the final effect. I love it. Considering it was my first attempt at a shadowbox, it turned out better than I had hoped and want nearly s painful or a headache as I thought it may be. I’m really excited now to do a few more with proper strip lights.